SSO: HOW IT WORKS
The Basics
Before you enable SSO, anyone who is only a member of your Mighty Network (but hasn’t created a login yet via your external site) will need to create a login first on your external site using the same email address they’re already using in your Mighty Network. Then, our system automatically merges their accounts based on email address the first time they log in on Mighty with SSO in place. When someone clicks on “Sign In” or “Join” from your Mighty Networks landing page with SSO enabled, they will be redirected to your external login flow. All Mighty Networks hosted login flows (including the option to input an email address and password) and initial profile creation pages will be disabled. Then, once a member successfully authenticates through your website or external portal, they are automatically redirected back into your Mighty Network. Across the web experience, iOS app, and Android app, the same “sign in” flow dictated by your external website and authentication system will be visible to all members who join or sign in.Required Compliance Steps
When SSO is in place, Mighty Networks needs to make sure that both your team and your members are protected, and everyone has agreed to the appropriate policies. Therefore, we have important compliance steps that must be added into the first-time login flows for everyone. By default, Mighty adds an interstitial that everyone will see just once, which prompts them to review and agree to our terms, as well as yours (if you have elected to also add a link to your terms following these instructions). Below is a preview of what this interstitial looks like in the sign-in flow, after someone has inputted their username and password on your external site for the first time, and they are redirected back to Mighty. The version on the left shows how it will display if you have your own custom terms linked within your network. The version on the right will display if you do not have your custom terms linked.
Optional Compliance Flow for Mighty Pro Hosts
If you are on Mighty Pro, there is an additional option available where you can have members accept these terms within your own SSO flows. If you would like to choose this option instead of displaying the interstitial mentioned above, we’ll need to ask you to add links to both the Mighty Networks Terms and Privacy Policy within the footer of both your sign up and your sign in pages. This will ensure full compliance between our two systems. Mighty Pro Hosts must notify our team using chat@mightynetworks.com if you take this step, so that we can verify the links on your sign up and sign in pages, and remove the compliance popup mentioned above. Here’s an example of how this can look when you add our terms links to the footer of your sign up and sign in pages: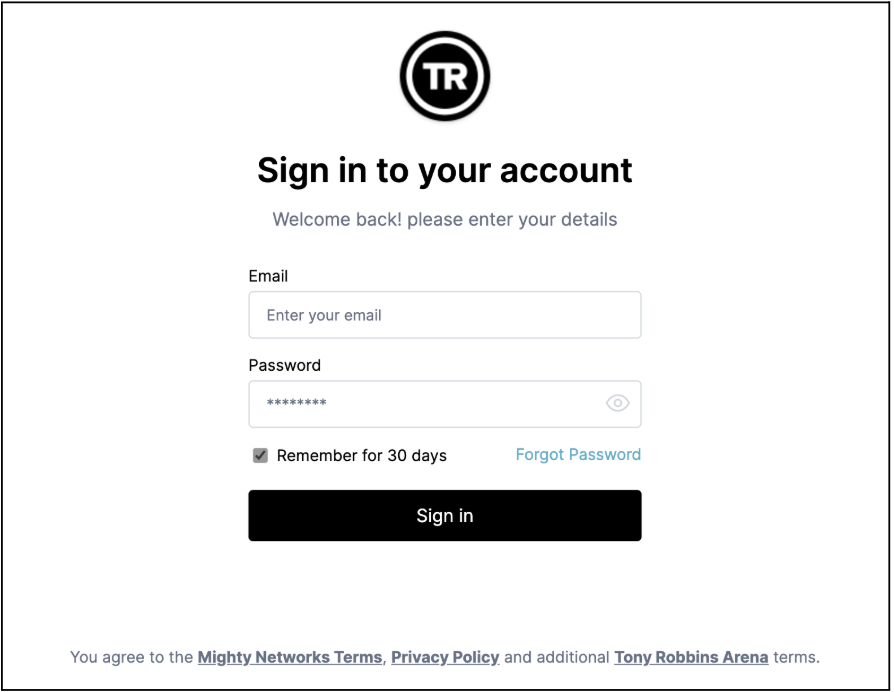
How Members Log In
When you have SSO enabled, everyone who joins or signs into your Mighty Network will need to pass through your external authentication system and your external sign in or sign up pages before they can be a full or limited member of the Network. The experience is the same whether someone is signing in or creating an account on the web or in the iOS or Android app. You’re free to set up the specific privacy and access settings that you want for your Network, but with SSO enabled it will be up to your team to decide how people create accounts and are authenticated into the experiences you’re hosting on Mighty. In very simple terms, the flow is: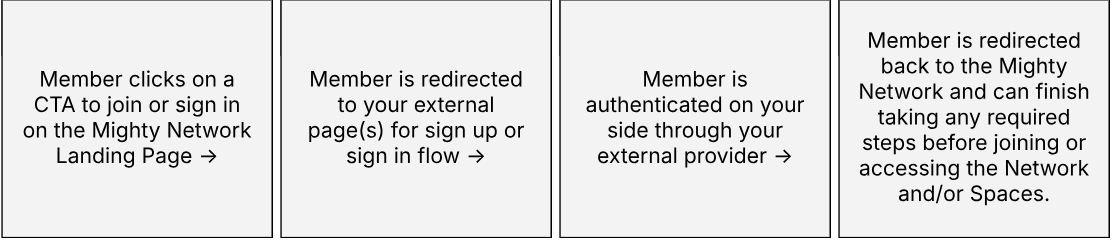
If You Already Have Existing Members with Mighty Networks Logins
If you haven’t set up the SSO integration yet, but you have existing members in your Mighty Network, you’ll need to make sure that everyone has a login with your external provider with a matching email address before you can safely turn on SSO. We strongly recommend downloading your member list from Mighty and reconciling the data before you turn on SSO, so that you can ensure that all existing members of your Network will have logins through your external provider with the _same email address _they’re currently using on Mighty to log in. On the backend, once SSO has been enabled, Mighty will merge existing member accounts the next time someone logs in based on the email address. This way, existing members will not create duplicate profiles when you turn SSO on and they can keep their existing profiles and activity. It’s generally best if those who have different emails across both services don’t sign in again until the email addresses have been lined up. The easiest way to fix this is for a member to first update their email address on your external site to match what they used for Mighty Networks, then have them sign in again to your Mighty Network once SSO has been enabled.SETTING UP SSO
Technical Requirements
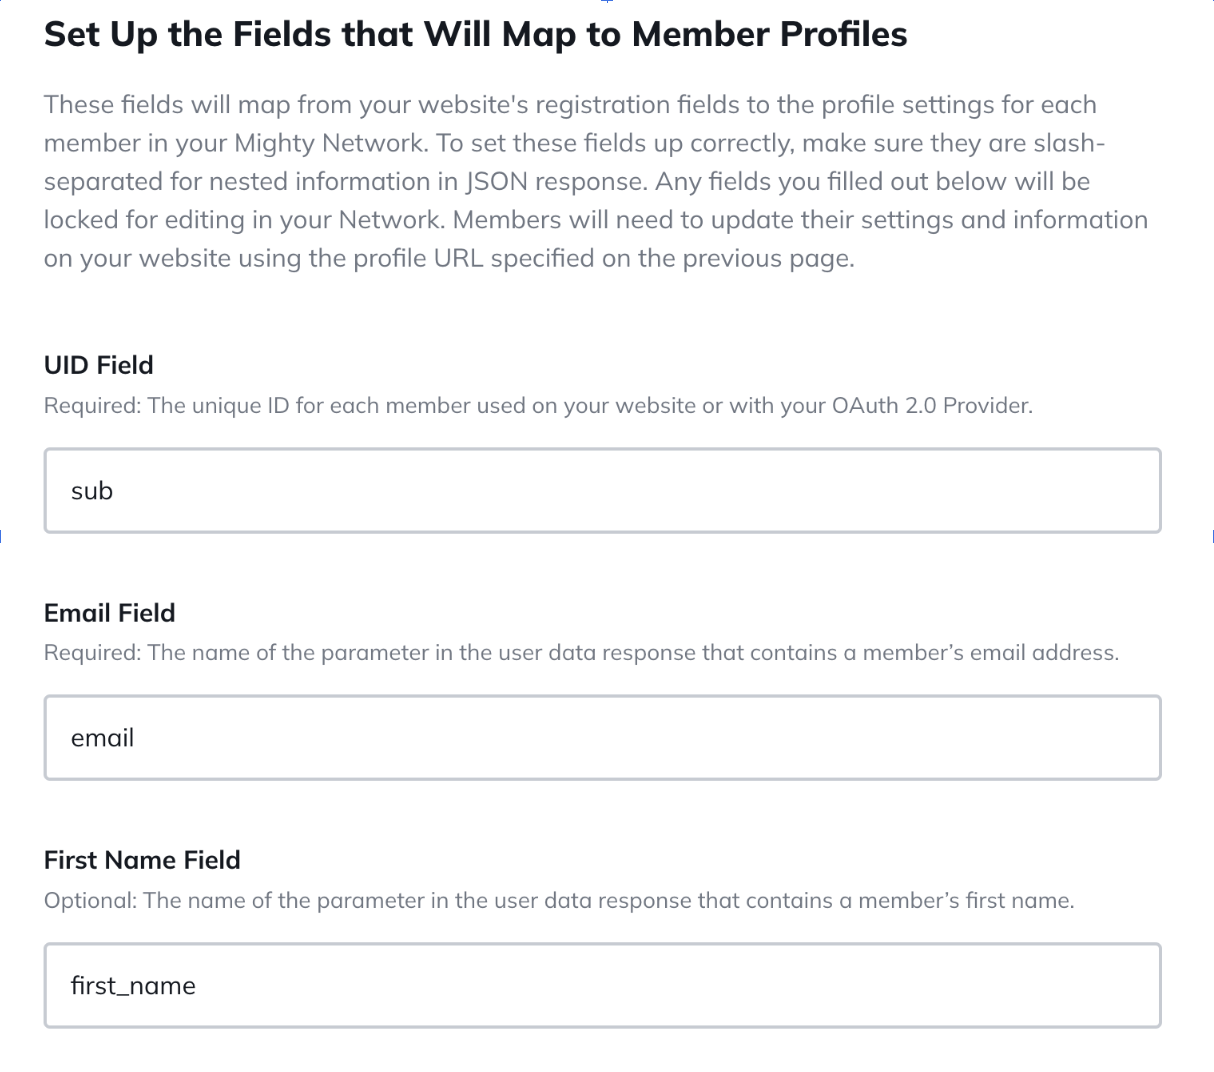
OAuth2 (https://oauth.net/2) is the industry-standard protocol for authorization used by Facebook Connect and other authentication services today. It’s also what we use for Mighty Networks SSO. As an open standard, “OAuth 2.0 supersedes the work done on the original OAuth protocol created in 2006. OAuth 2.0 focuses on client developer simplicity while providing specific authorization flows for web applications, desktop applications, mobile phones, and living room devices.” For SSO between a Host’s external service and a Mighty Network to work, the Host needs to have a database of members with:- Email Address
- Unique ID for each Member
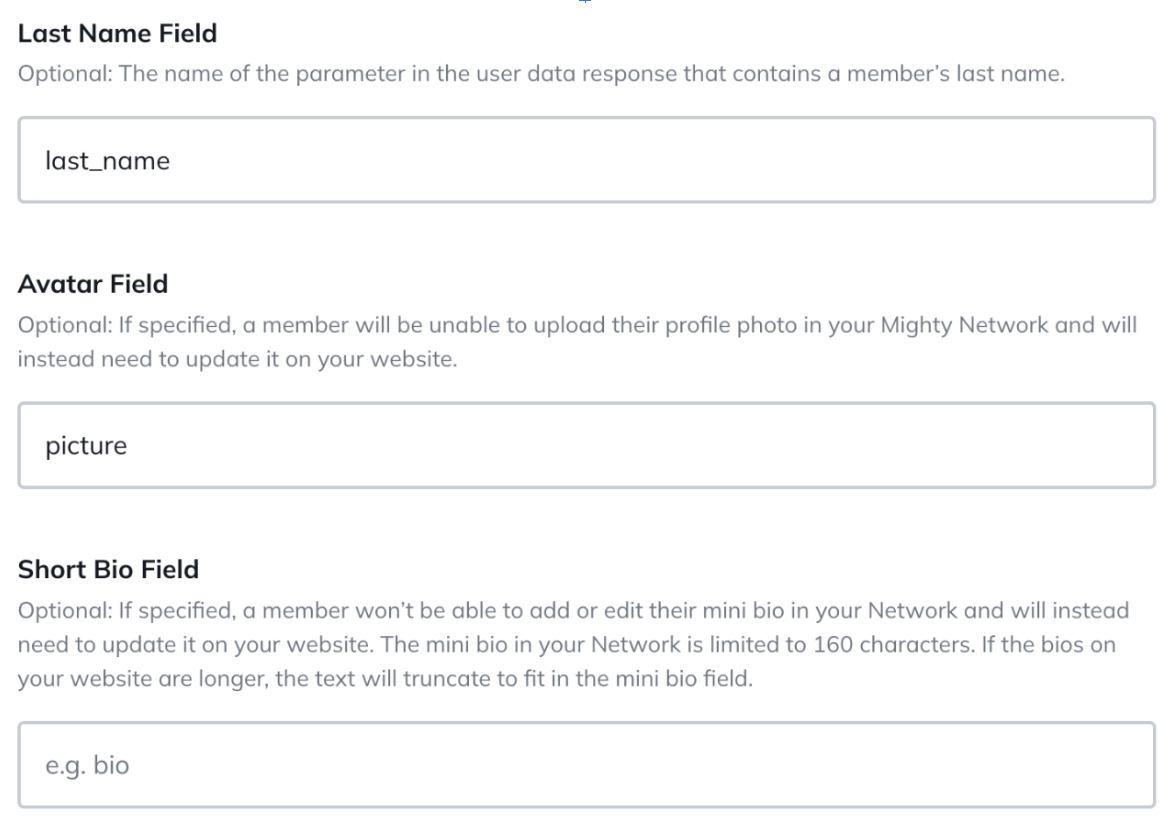
- First and Last Name
- Photo/Avatar
- “Bio” or text up to 160 characters
The External Service + Mighty Network Member Sign In and Sign Up Flow
When your technical team enables SSO, it replaces Mighty’s standard sign up and sign in flows. The new external authentication and account service appears in an in-app browser within the Mighty Network across the web, iOS, and Android apps. For SSO to work, it must be a mobile responsive page optimized for mobile browsers and our in-app browser. Do not end your sign up or sign in experience on any page with external navigation of any kind. If you are on Mighty Pro, doing this will affect the ability for us to get your Mighty Pro apps approved in the app stores. Your SSO sign up or sign in flow also must redirect back to Mighty Networks at the end of the process. Your external service becomes responsible for:- Account Management (including password management)
- Account Editing
- Account Syncing
Using Social Sign In Options
Using the Mighty Networks SSO integration also means that if you want to offer options for members to use social sign on options such as Facebook Connect, Google Sign In, LinkedIn, or Sign In with Apple authentication, that will need to be done on your external service, not via Mighty Networks. If you decide to include these options, our Mighty Networks team will need to know in advance to adjust an important setting on our side. One important note if you are on Mighty Pro: If you decide to include social sign in options within your SSO login flow, our friends at Apple require that if you add any form of non-email/password login, you must also include Sign in with Apple authentication. This is a requirement for us to be able to build, launch, and continually make updates to your Mighty Pro iOS app.Implementation Checklist & Review
This is the checklist of steps that need to be completed before you should feel comfortable enabling SSO in your Mighty Network for all current and future members.- Create a Test Environment
- Start a free trial at this link for a separate Mighty Network to be used only for SSO testing.
- Notify chat@mightynetworks.com that you’ve set up a new test network for SSO purposes and send us the URL of your test network, so we can temporarily enable the right premium features for you.
- Fill in the fields under Admin > Integrations > Single Sign On and begin testing the sign up or sign in flows with your external provider.
- Your External Service Setup
- Required: Confirm that Email and Unique ID are created
- Optional: First Name and Last Name fields are created
- Set your refresh token settings to 30 days
- Ensure you have a mobile responsive design for all login flow pages
- Optional if you are on Mighty Pro and you do not want to use the interstitial popup described above under “Required Compliance Steps”: Add links to the Mighty Networks Terms of Use and Privacy Policy on your sign up and sign in pages, and notify our team when these links are visible
- Third Party Logins (Social Sign On)
- If using, notify our team in advance so we can adjust an important setting on our side
- If you are on Mighty Pro, note that in order for your iOS app to be approved by Apple, you must include Sign in with Apple as one of your third party login options if you are using others (like Google, LinkedIn, Facebook, etc)
- Testing
- Confirm sign-in flow with at least 3 different accounts in your test network and in the Mighty Networks iOS and Android apps
- Once you’ve confirmed the flow works on all platforms, test that at least one of the accounts stays logged in as expected over several days. Since you’ve set the refresh token to not require a new login for 30 days, it should not require a new login the next time you visit the Network.
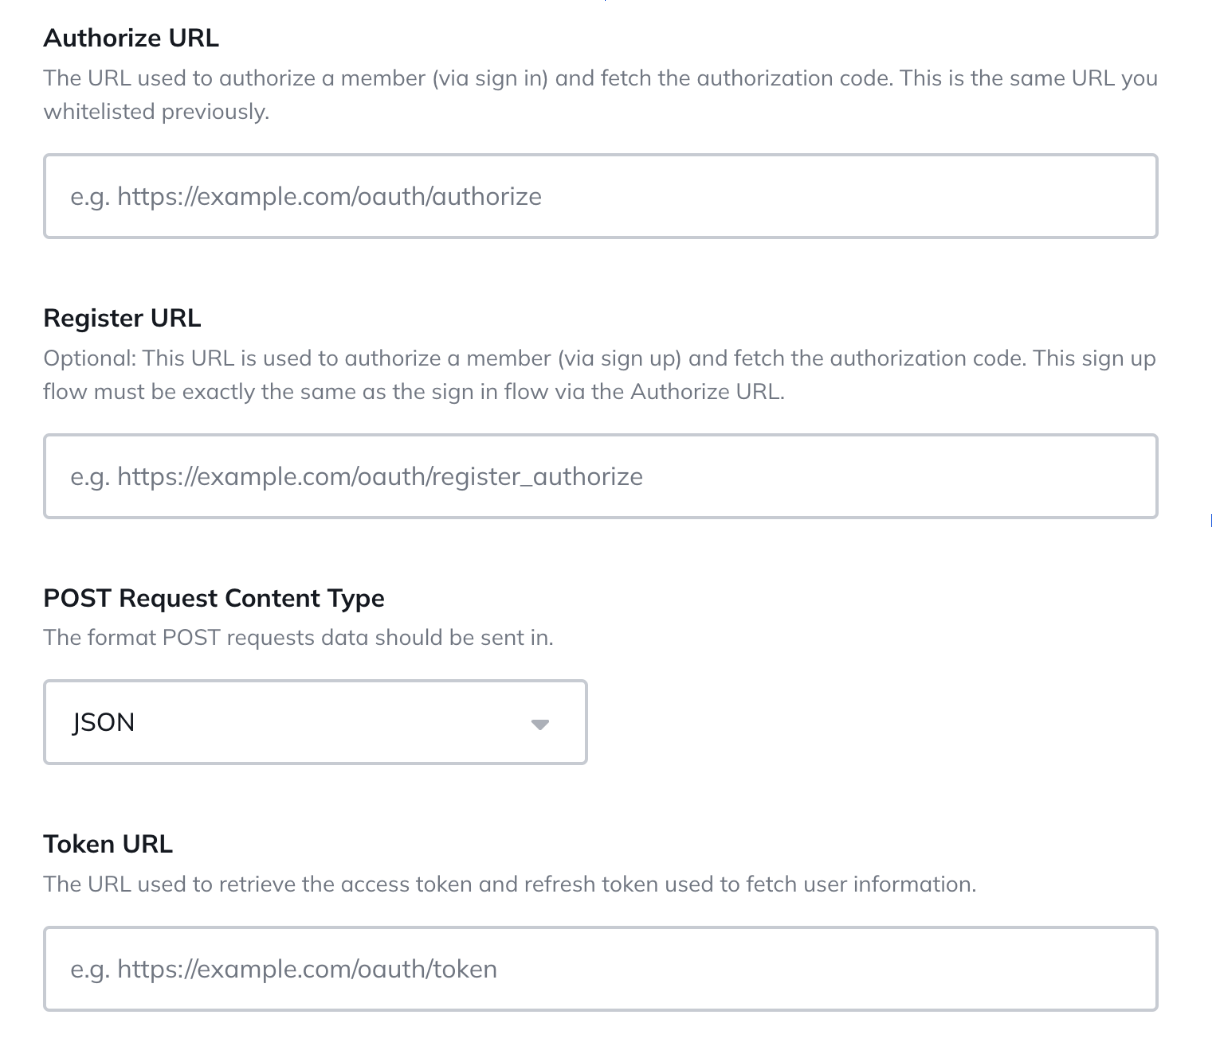
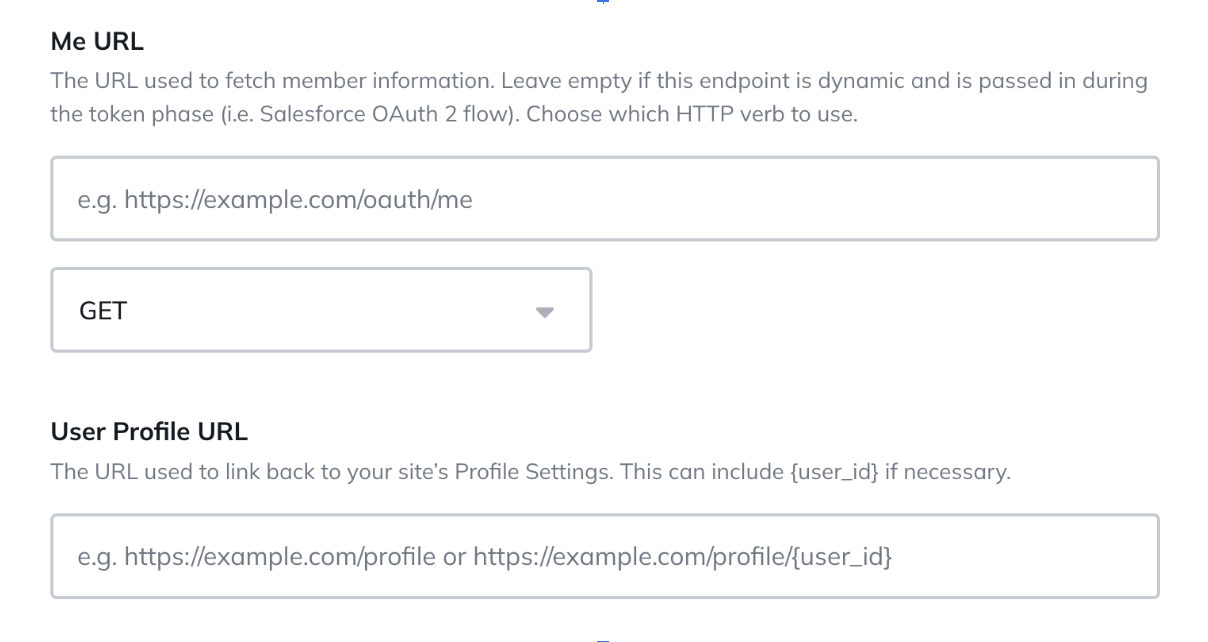
Setting Up a Test Environment
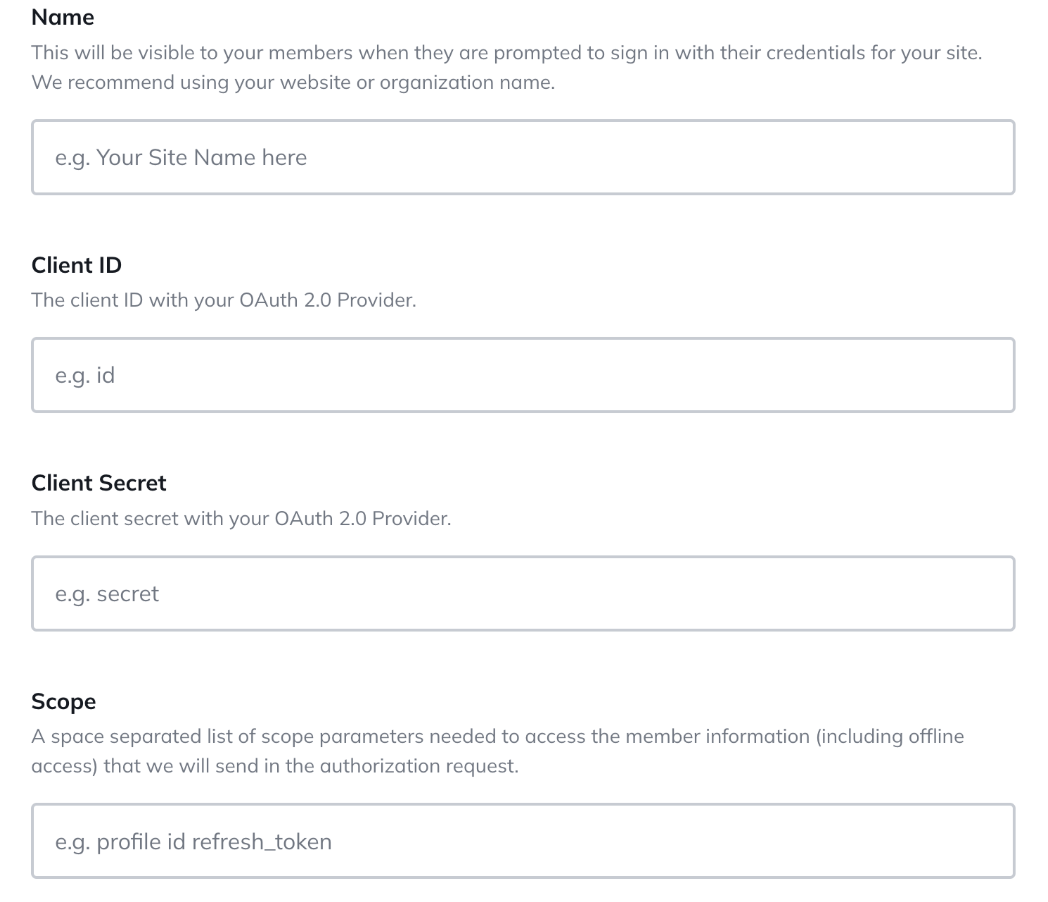
Before we enable SSO in your Mighty Network, you will create a separate test environment by starting a free trial at this link and sharing the URL with our team. We will then activate the premium features in your test network to ensure you have free access ongoing to this test environment. You will navigate to Admin > Integrations > Single Sign On and fill out the following fields outlined below in the test network, so that we can ensure the experience works and will be smooth for your members. Here is an example of the fields you’ll be asked to fill out: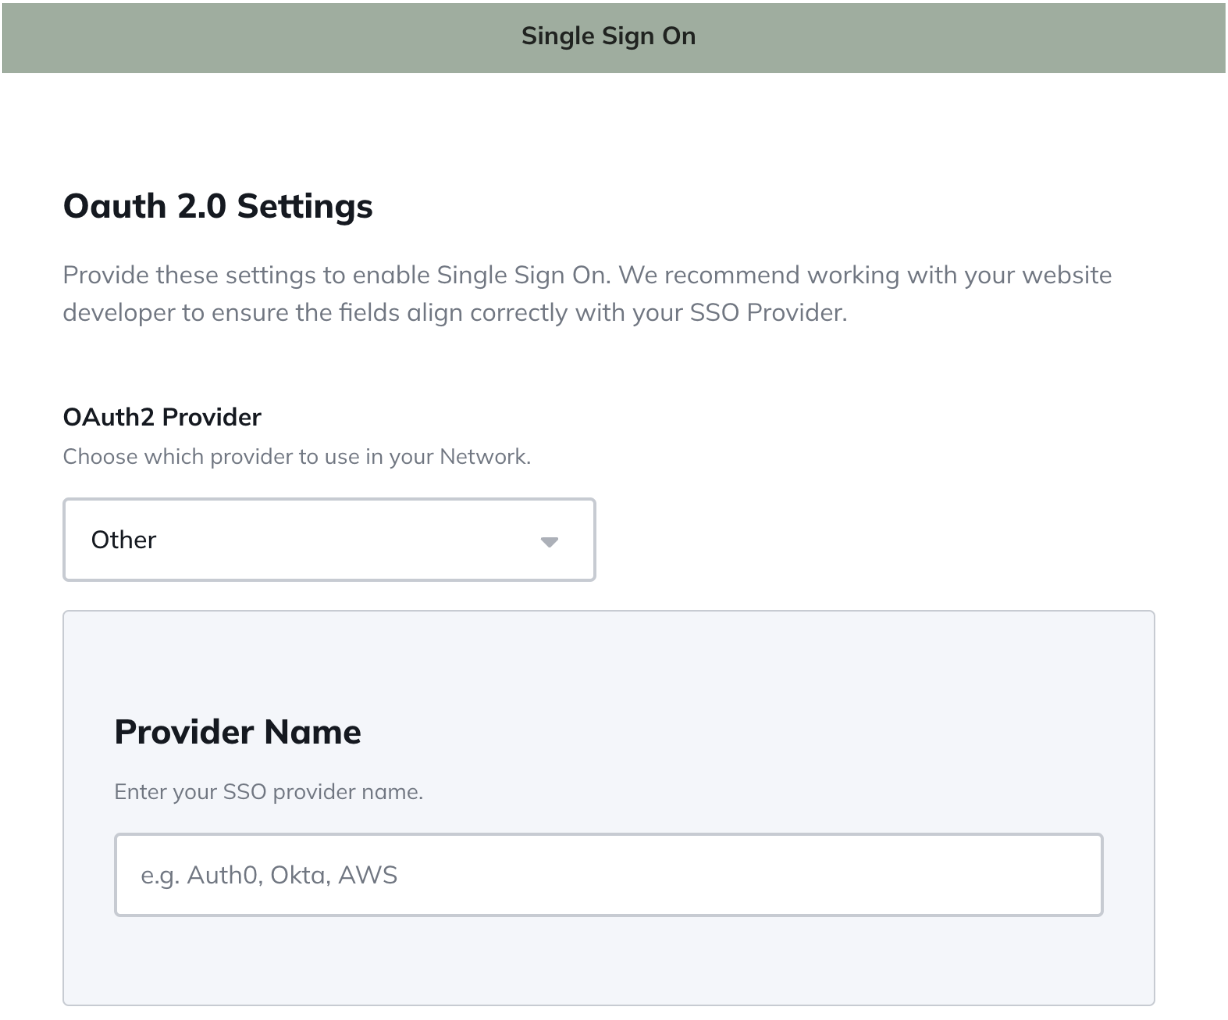
Troubleshooting
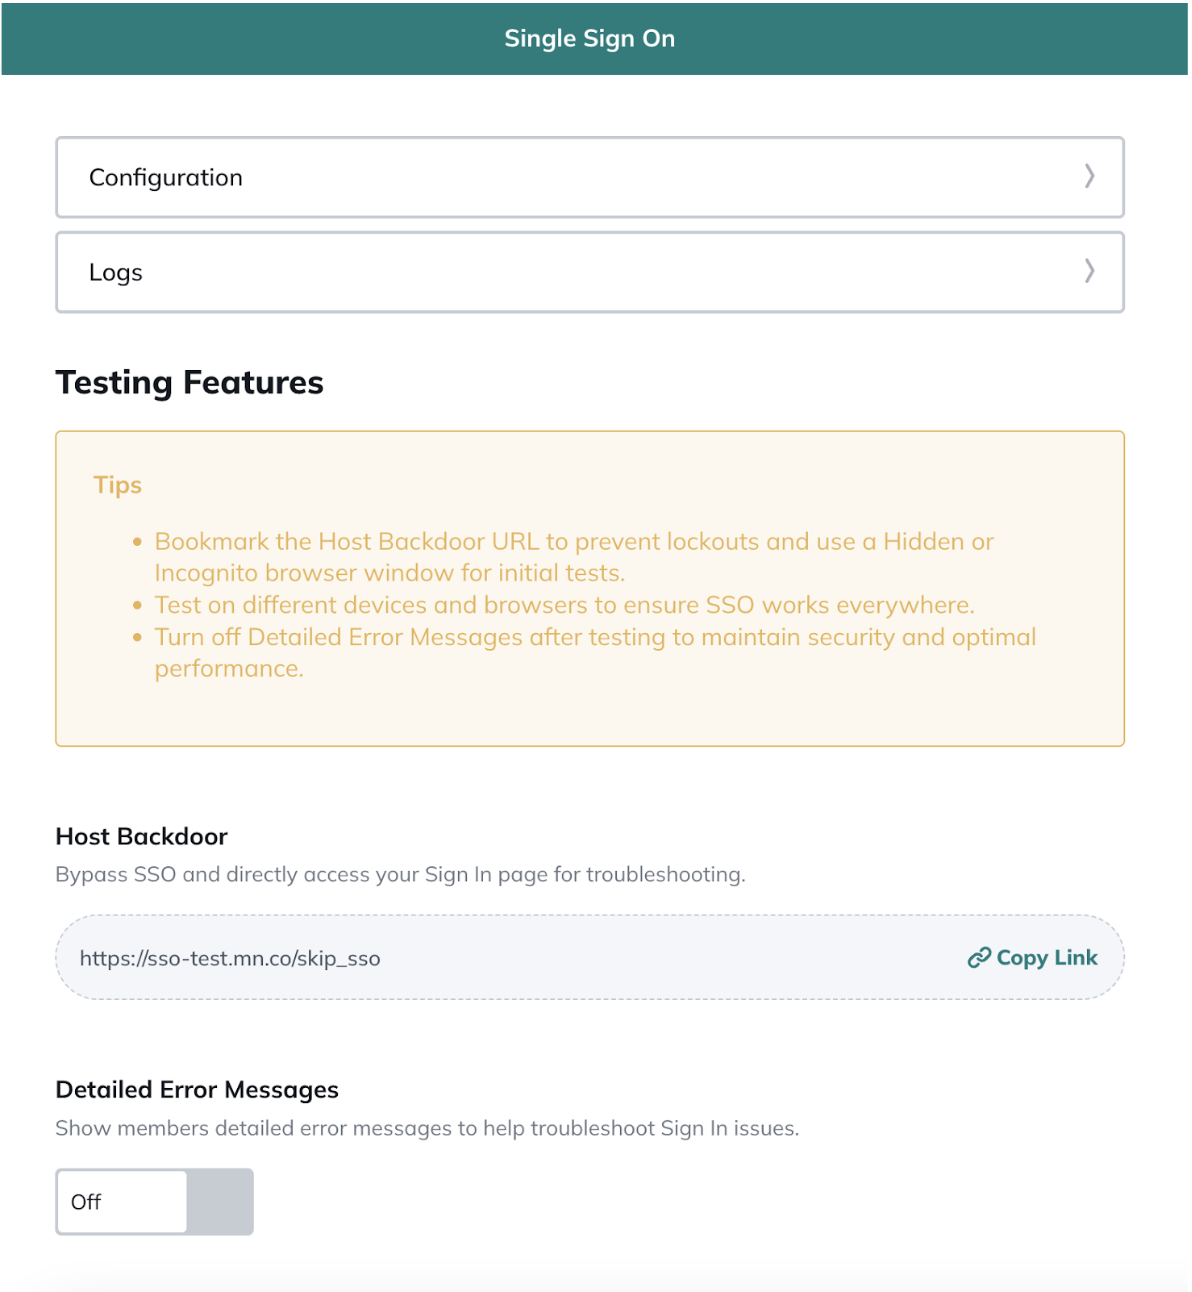
After finishing the configuration, your SSO will be enabled and you will be redirected to the SSO Manage Page. You can also find it by going to Admin > Integrations > SSO > Manage . On the SSO Manage page, you will see a few options to help you to test your configuration.- Configuration: To change any of the previous fields you have configured.
- Logs: You will be able to see up to 200 logs from the last 3 hours.
- Testing Features:
- Host Backdoor: Bypass SSO and directly access your Sign In page for troubleshooting with a link. Your link will be something like: https://your-network.mn.co/skip_sso
- *Important* Be sure to save your Backdoor link somewhere accessible in case you get locked out and need to bypass the SSO Sign-In process.
- Detailed Error Messages: Show members detailed error messages to help troubleshoot Sign In issues.
- When the user is redirected to the configured Authorization URL
- When the SSO provider calls the Mighty Callback URL
- The response from the Token URL
- The response from the ME URL
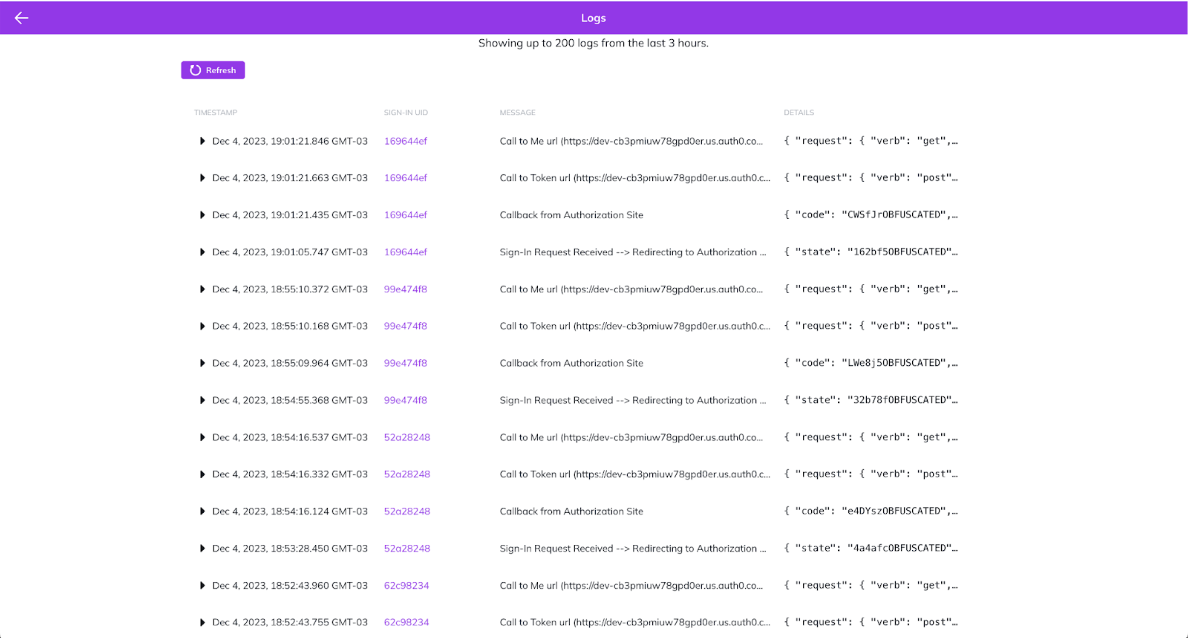
The OAuth 2.0 Handshake
In order to understand and take advantage of the logs, you must have a good understanding of the OAuth 2 protocol. Below, you can see a chart explaining the OAuth2 flow: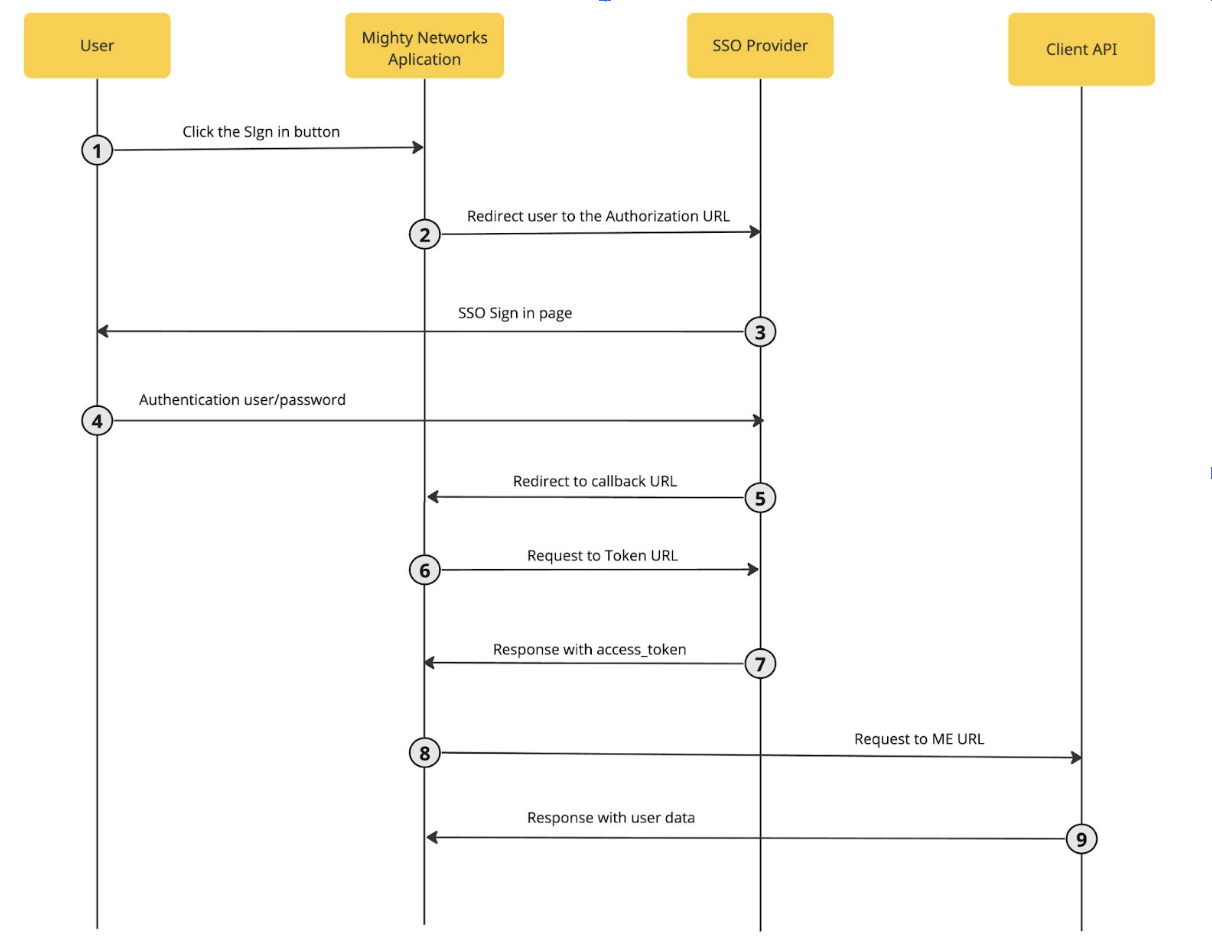
- User clicks Sign in within Mighty Networks
- User is redirected to SSO provider Authorize URL with the following parameters:
- client_id (configured on the SSO form)
- redirect_uri (Callback URL)
- response_type
- scope (configured on the SSO form)
- state (generated string)
- SSO Provider redirects user to login and authorization screen
- User authenticates using one of the configured login options
- SSO Provider redirects the user to the Callback URL with single-use authorization code. Expected parameters are:
- state (same that was sent to the Authorize URL)
- code (single-use authorization code)
- Mighty app sends a POST request to the Token URL with the following attributes on the request body:
- code (single-use authorization code)
- client_id
- client_secret
- grant_type
- redirect_uri
- SSO Provider respond with access data (API response should set the header Content-Type as application/json)
- access_token or id_token
- refresh_token
- expires_in
- token_type
- Mighty App uses the access token as Bearer to call the ME URL to access information about the user. No other parameters are added to this request.
- API responds with requested data (API response should set the header Content-Type as application/json)
FREQUENTLY ASKED QUESTIONS
How long does it take to set up the SSO integration in my Mighty Network? We’ve seen it take as little as a week of development and setup, and as much as three weeks or more. It depends on whether you already have an external authentication system, existing mobile-optimized sign-in flows, and a technical team in place. We recommend adding a cushion of three weeks to any launch timeline to ensure there is an appropriate amount of time to execute and test the integration. After someone signs up on my external website or service post-SSO implementation, what happens on the Mighty Networks side? What is the flow? When someone signs up and creates an account on your external site, nothing happens until they show up and sign in to your Mighty Network for the first time. Their login to your external site is simply a way for them to sign in (similar to Facebook Connect as a login option) and there is no active pushing of account information from your external site to the Mighty Network until they choose to sign in for the first time using their credentials. Is a new member automatically subscribed to email notifications? As soon as a member shows up and joins or signs into your Mighty Network for the very first time, they will receive notifications relevant to them and based on what they have access to as a full or limited member. How does profile synchronization work going forward? When a member signs into your Mighty Network for the first time, we will sync their profile. This means that any fields you’ve sent from your database to Mighty (e.g. their name, email address, photo, or other fields) will sync with Mighty’s database. We’ll also sync again every time they sign in. In addition, we sync SSO profiles every day at around 7am PT. This way, member profiles and information including email addresses will be in sync regardless of whether or not they showed up each day. So, for example, if a member changes their email address in your database but does not sign into Mighty within the next day, we’ll automatically sync that new email address to Mighty within 24 hours. The sync works by calling the member info endpoint (i.e. me_url) and updates the data for the member (name, email, etc. in case anything changed). If it fails to get this response (due to token being expired or any other reason), it will mark the member as sso_out_of_sync. At that point, the member will need to login again using SSO when they come back to the site/app. Why must the SSO experience be mobile-responsive? Your members will be signing into your Mighty Network on the web and within Mighty’s iOS and Android apps. In order for us to ensure the experience is seamless and works properly on any device with any screen size, we require the sign in experience to be mobile responsive. Why must I redirect back to Mighty Networks? Apple requires that your SSO Sign Up or Sign In flow redirect back to Mighty Networks at the end of the process when someone is signing in on iOS. If you are on Mighty Pro, your branded app will not be approved by Apple if this redirect is not in place. Can I launch my Mighty Network and add SSO later? You absolutely can! While it’s not going to be as seamless and will present some challenges, the basic process will require:- Downloading your existing Mighty Networks members and their email addresses
- Making new accounts for all existing members in your system with the exact same names and email addresses
- Ensuring there is an option for members to add a password, and a place for them to manage their account ongoing (name, email address, etc.)
- Creating a mobile responsive sign in flow for members
- Communicating with your members that they will have a new login going forward, and will be asked to set a password or use a different login flow when they next sign in
- Account Management (including password management)
- Account Editing
- Account Syncing
- First and Last Name
- Email Address
- Unique ID for each Member
- Photo/Avatar
- “Short Bio” or text up to 160 characters
APPENDIX
Profile Endpoint (me_url) Details
As part of our integration with your Single Sign On (SSO) solution, which is expected to follow OAuth 2.0 protocols, our server will make requests to your SSO server’s Profile Endpoint, commonly referred to as me_url. Authentication Requirements Bearer Token: Our server will include the access token as a Bearer token in the Authorization header of the HTTP request for authenticating the request. Request Specifications: Method: (GET or POST) As configured in the integration settings for the ME URL in your network settings. Endpoint URL Format: We will call the ME_URL that you configured in your integration settings. The ME_URL is the endpoint that your SSO server exposes for retrieving the user’s profile information. Expected Response Format Data Format: We expect the response from your Profile Endpoint to be in JSON format. Response Fields Your Profile Endpoint should return a JSON response containing the following fields as per the mapping configured in your integration settings. For example: If the mappings defined in the integration settings are as follows:- First Name Field: first_name
- Last Name Field: last_name
- Email Field: email
- UID Field: uuid
- Avatar Field: picture
- photos/avatar/url
Specifics for Auth0 SSO
Where do I find all the OAuth endpoints for my Auth0 Application? These are found in the Applications tab > Select your application > Advanced Settings > Endpoints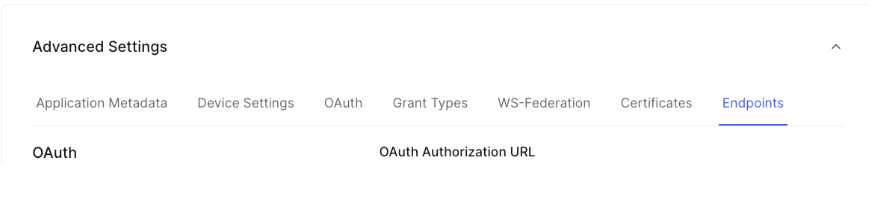
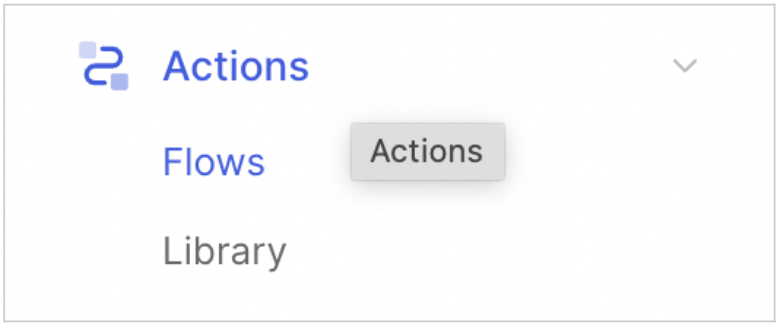
-
Select Actions menu > Flows submenu > Select Login.
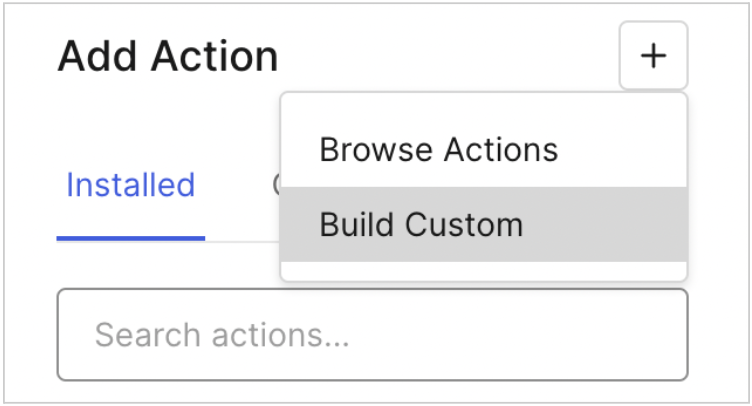
-
Click on the “+” button on the Add Action section and then select “Build Custom”.
-
You will need to create your action setting any name you like. Leave default values for Trigger and Runtime values.
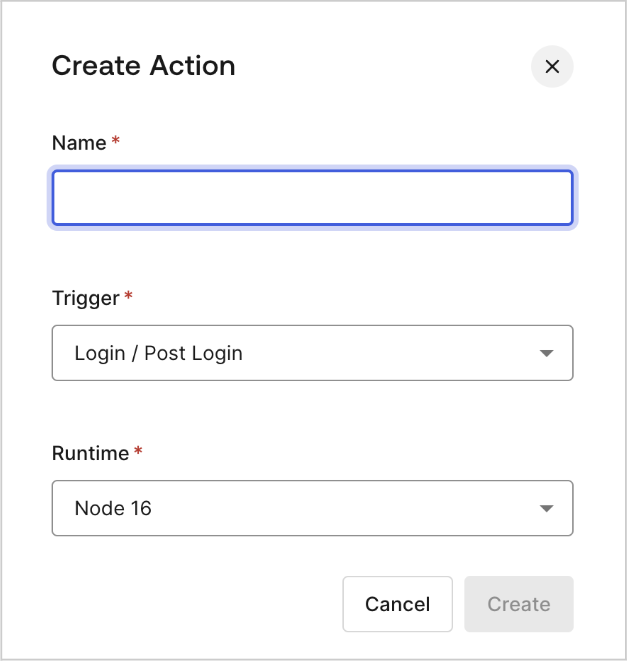
-
Implement a function in the editor that opens after you hit ‘Create’.

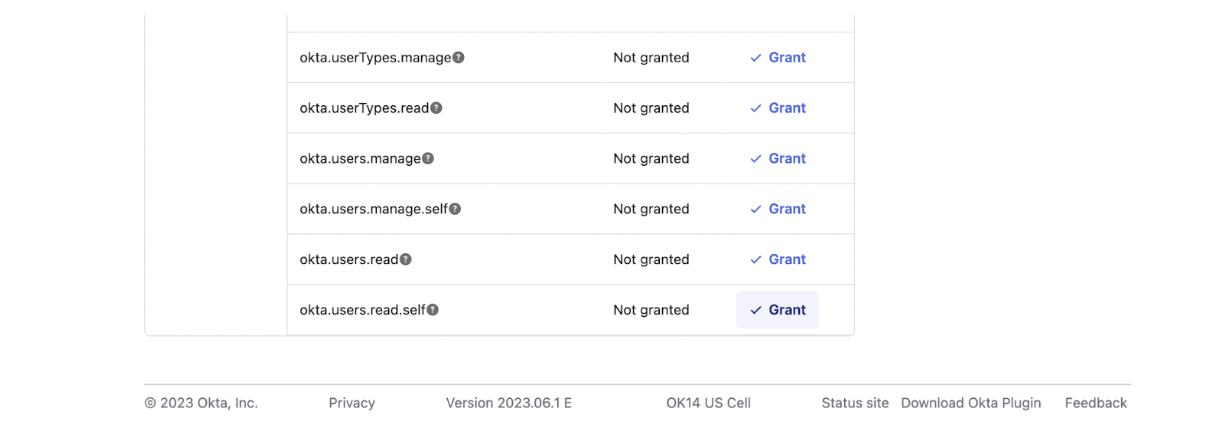
Specifics for Okta SSO
How can I enable Refresh Tokens? When using Okta as your SSO provider, you will need to make sure that “Allowed grant types” includes “Refresh Token.” This ensures that on the Mighty Networks side, we are able to sync the account on our own without needing the user to keep signing in regularly due to the token expiration time. See an example below for how to do that in Okta: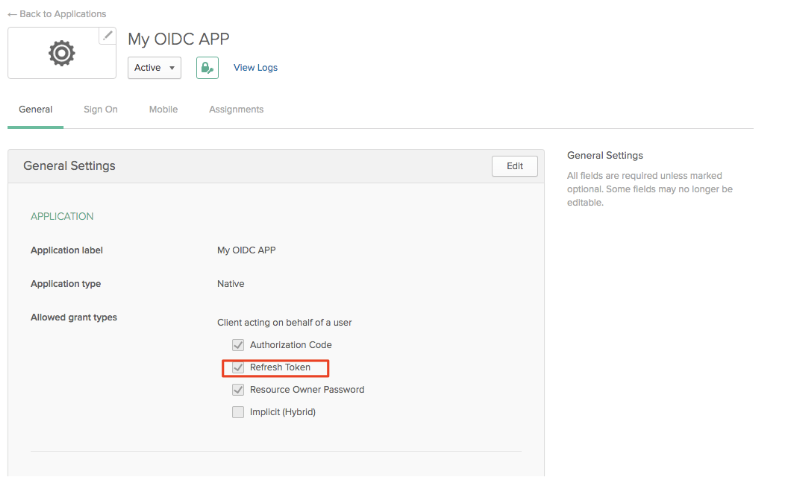
Authorize URL: https:///oauth2/v1/authorize
Token URL: https:///oauth2/v1/token Me URL: https:///api/v1/users/me Helpful links:
- How to enable refresh token
- Create Oauth 2.0 application tutorial
- Get User info endpoint documentation
Specifics for AWS Cognito SSO
Which scopes do I need to enable? You need to enable the “OpenID”, “Email” and “Profile” scopes on the “Hosted UI” section to allow Mighty Networks to get the information for the user that is logged in.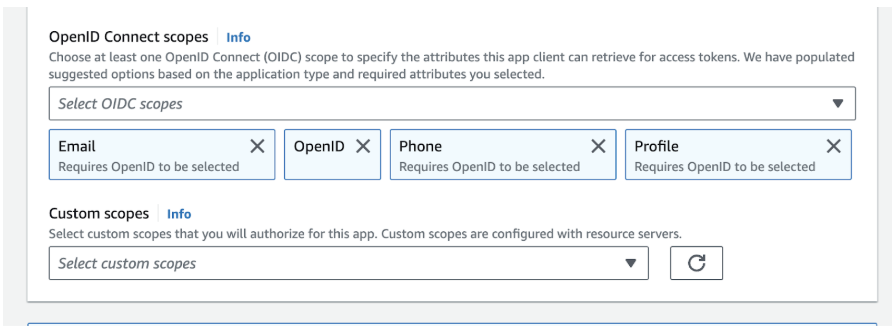
Token URL: https:///oauth2/token Me URL: https:///oauth2/userInfo Helpful links: