> ## Documentation Index
> Fetch the complete documentation index at: https://docs.mightynetworks.com/llms.txt
> Use this file to discover all available pages before exploring further.
# How Do I Create a Waitlist?
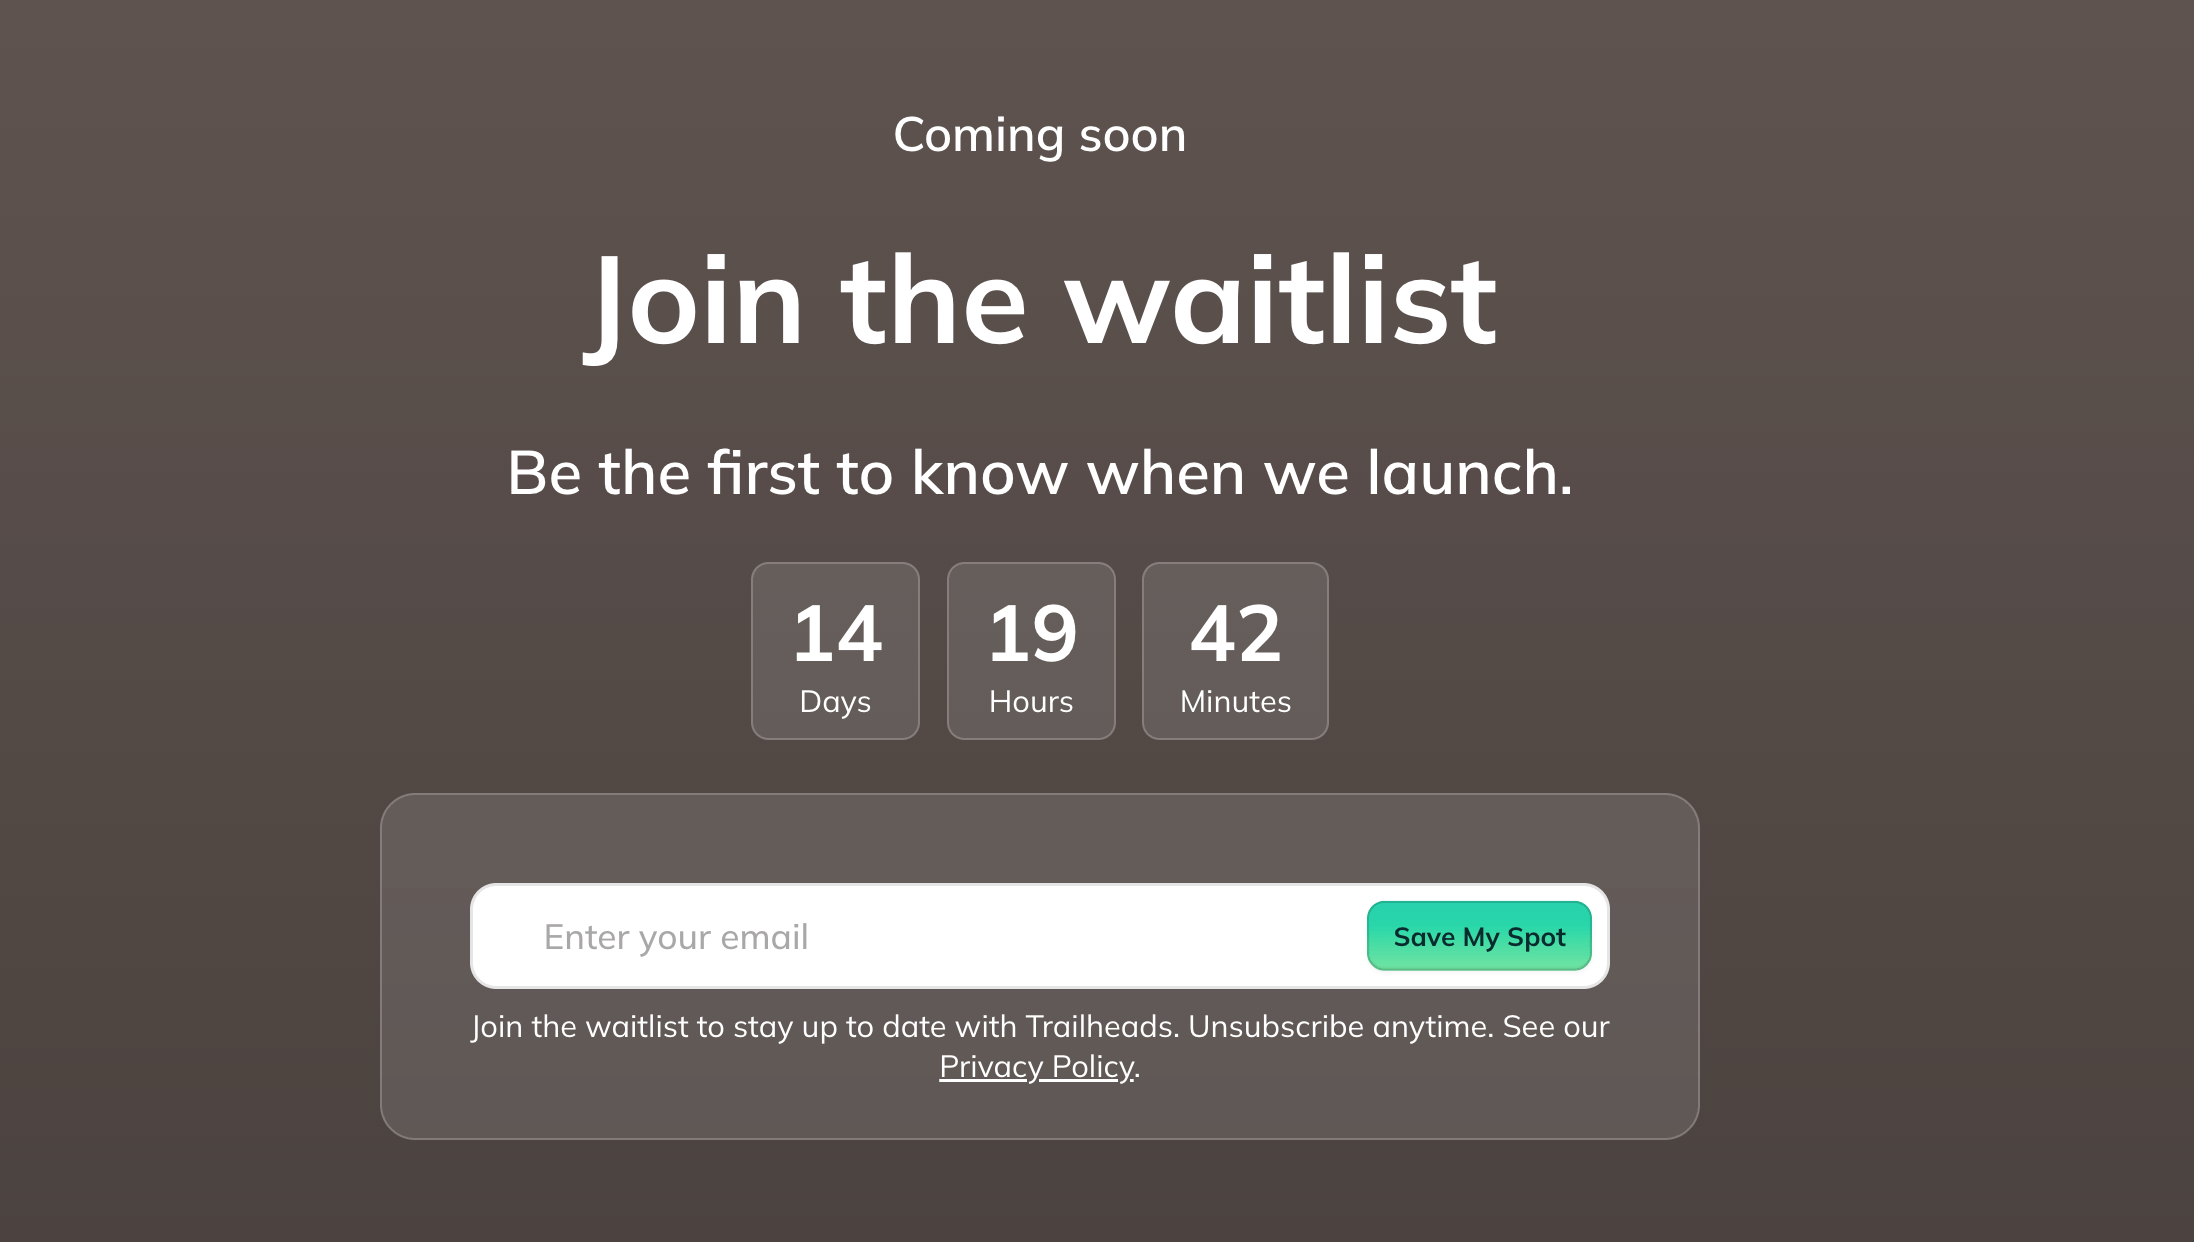
Waitlists let you collect interest before your Mighty Network, a new Plan, or an upcoming offering is ready to launch.
Instead of sending members to an experience that isn't available yet, you can create a waitlist, add it to a landing page, and start building your audience before launch.
 **Note:** Waitlists are currently available on web only.
## **Create a Waitlist**
You can create a waitlist from a[ Landing Page](https://docs.mightynetworks.com/for-hosts/marketing-features/how-can-i-customize-my-mighty-networks-landing-page#how-to-set-up-your-landing-page) or directly from the Waitlists page in Admin.
### **From a Landing Page**
* Go to **Admin** > **Marketing** > **Landing Pages**.
* Create a new landing page or edit an existing one.
**Note:** Waitlists are currently available on web only.
## **Create a Waitlist**
You can create a waitlist from a[ Landing Page](https://docs.mightynetworks.com/for-hosts/marketing-features/how-can-i-customize-my-mighty-networks-landing-page#how-to-set-up-your-landing-page) or directly from the Waitlists page in Admin.
### **From a Landing Page**
* Go to **Admin** > **Marketing** > **Landing Pages**.
* Create a new landing page or edit an existing one.
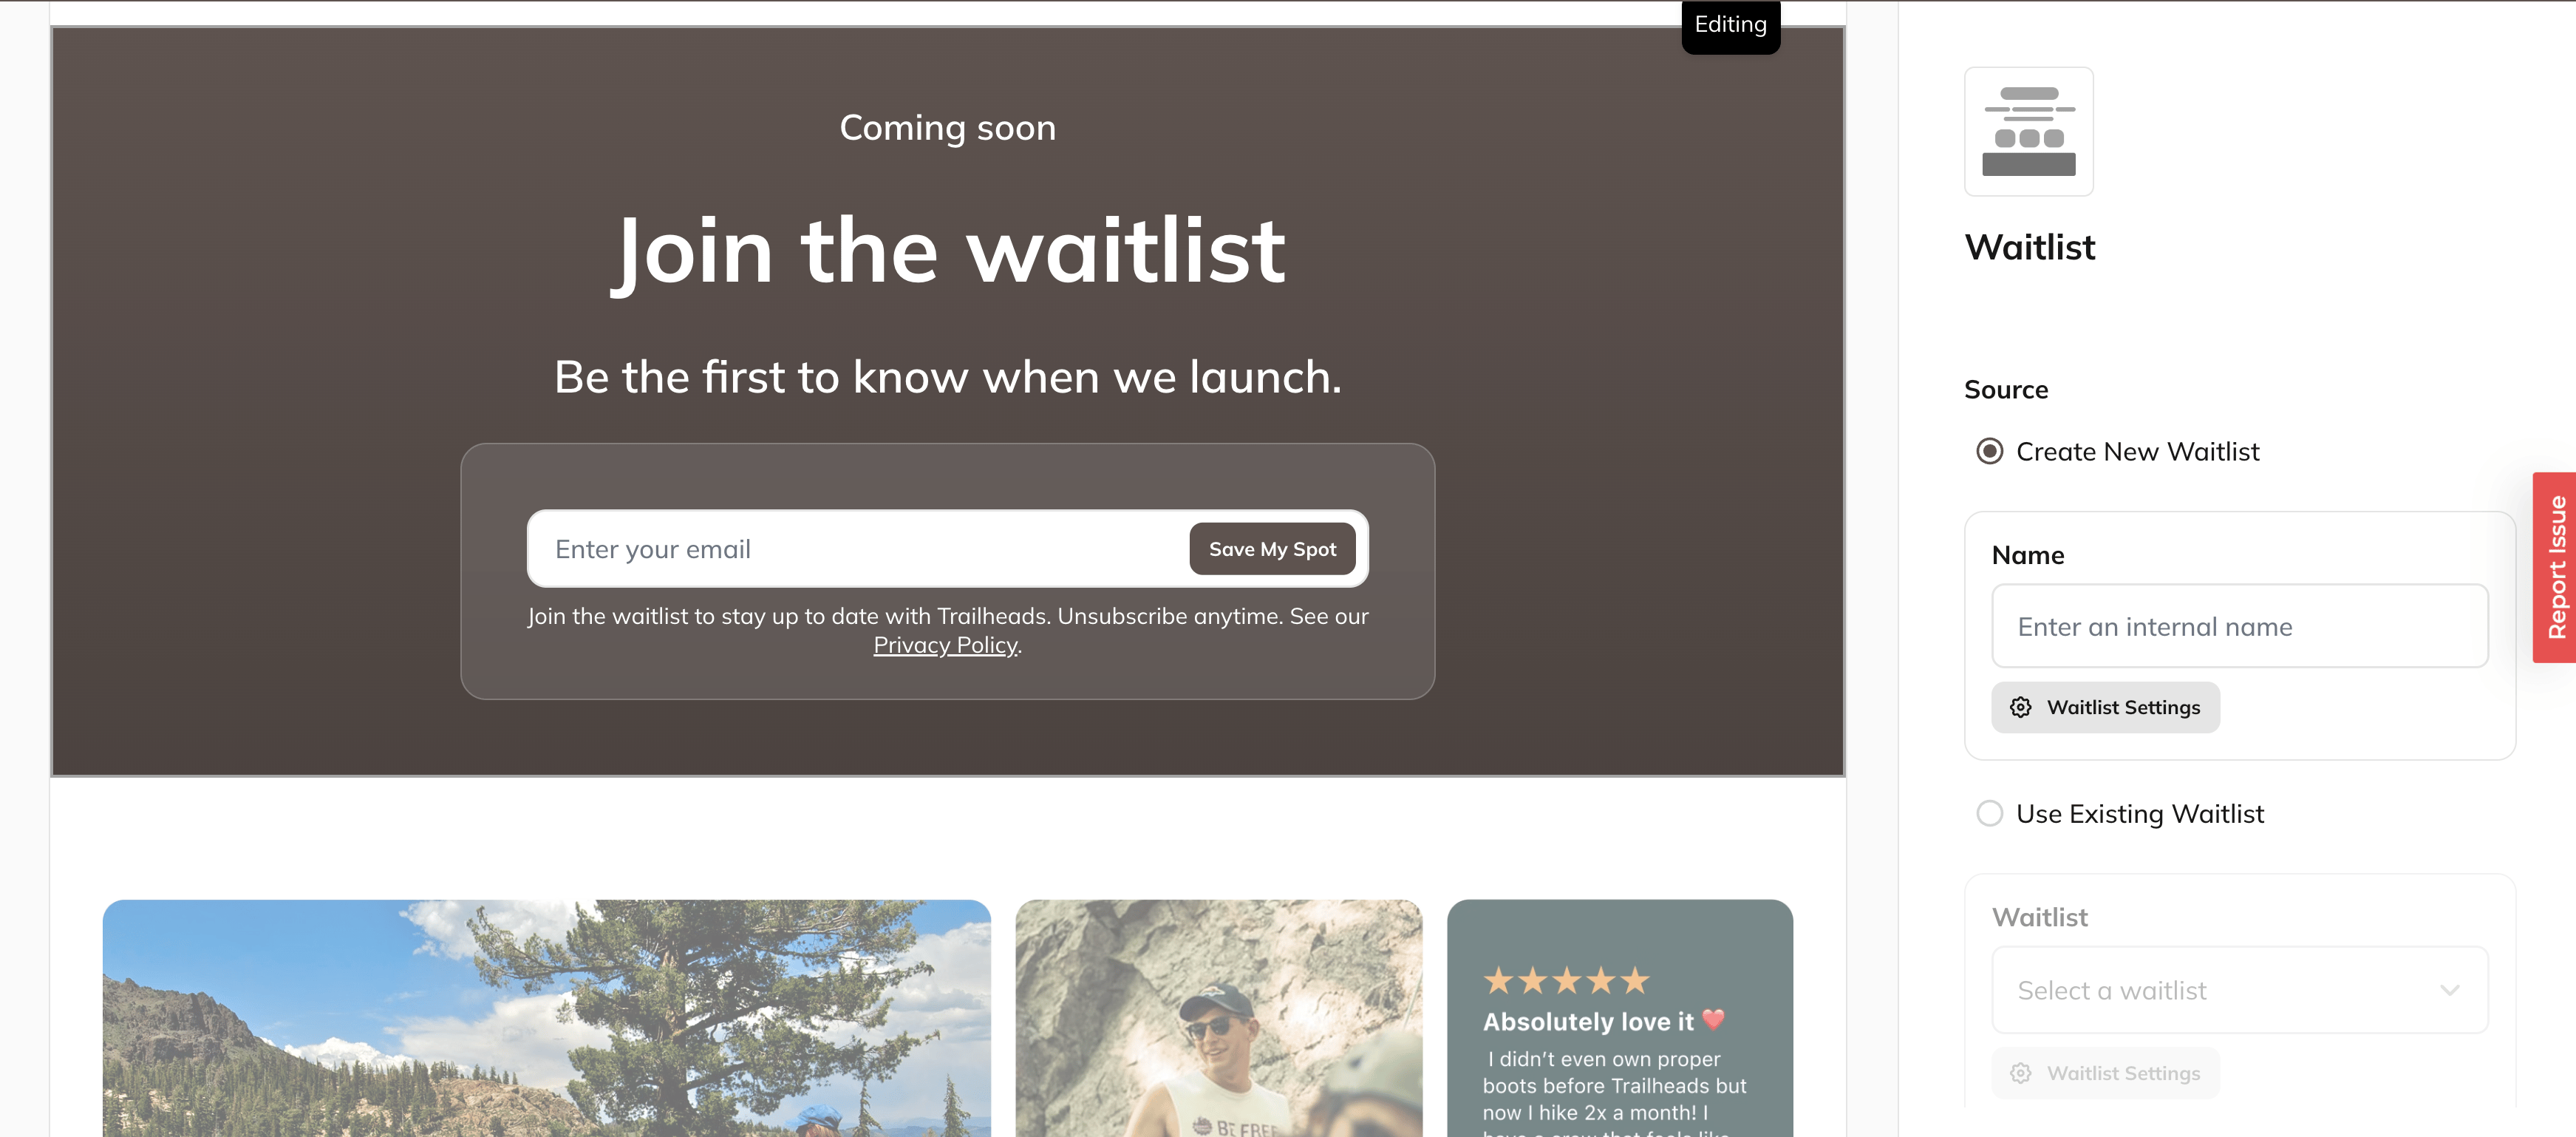 * Add a **Waitlist** section.
* Choose **Create New Waitlist** (or you can choose an existing one)
* Complete your waitlist settings:
* Add a **Waitlist** section.
* Choose **Create New Waitlist** (or you can choose an existing one)
* Complete your waitlist settings:
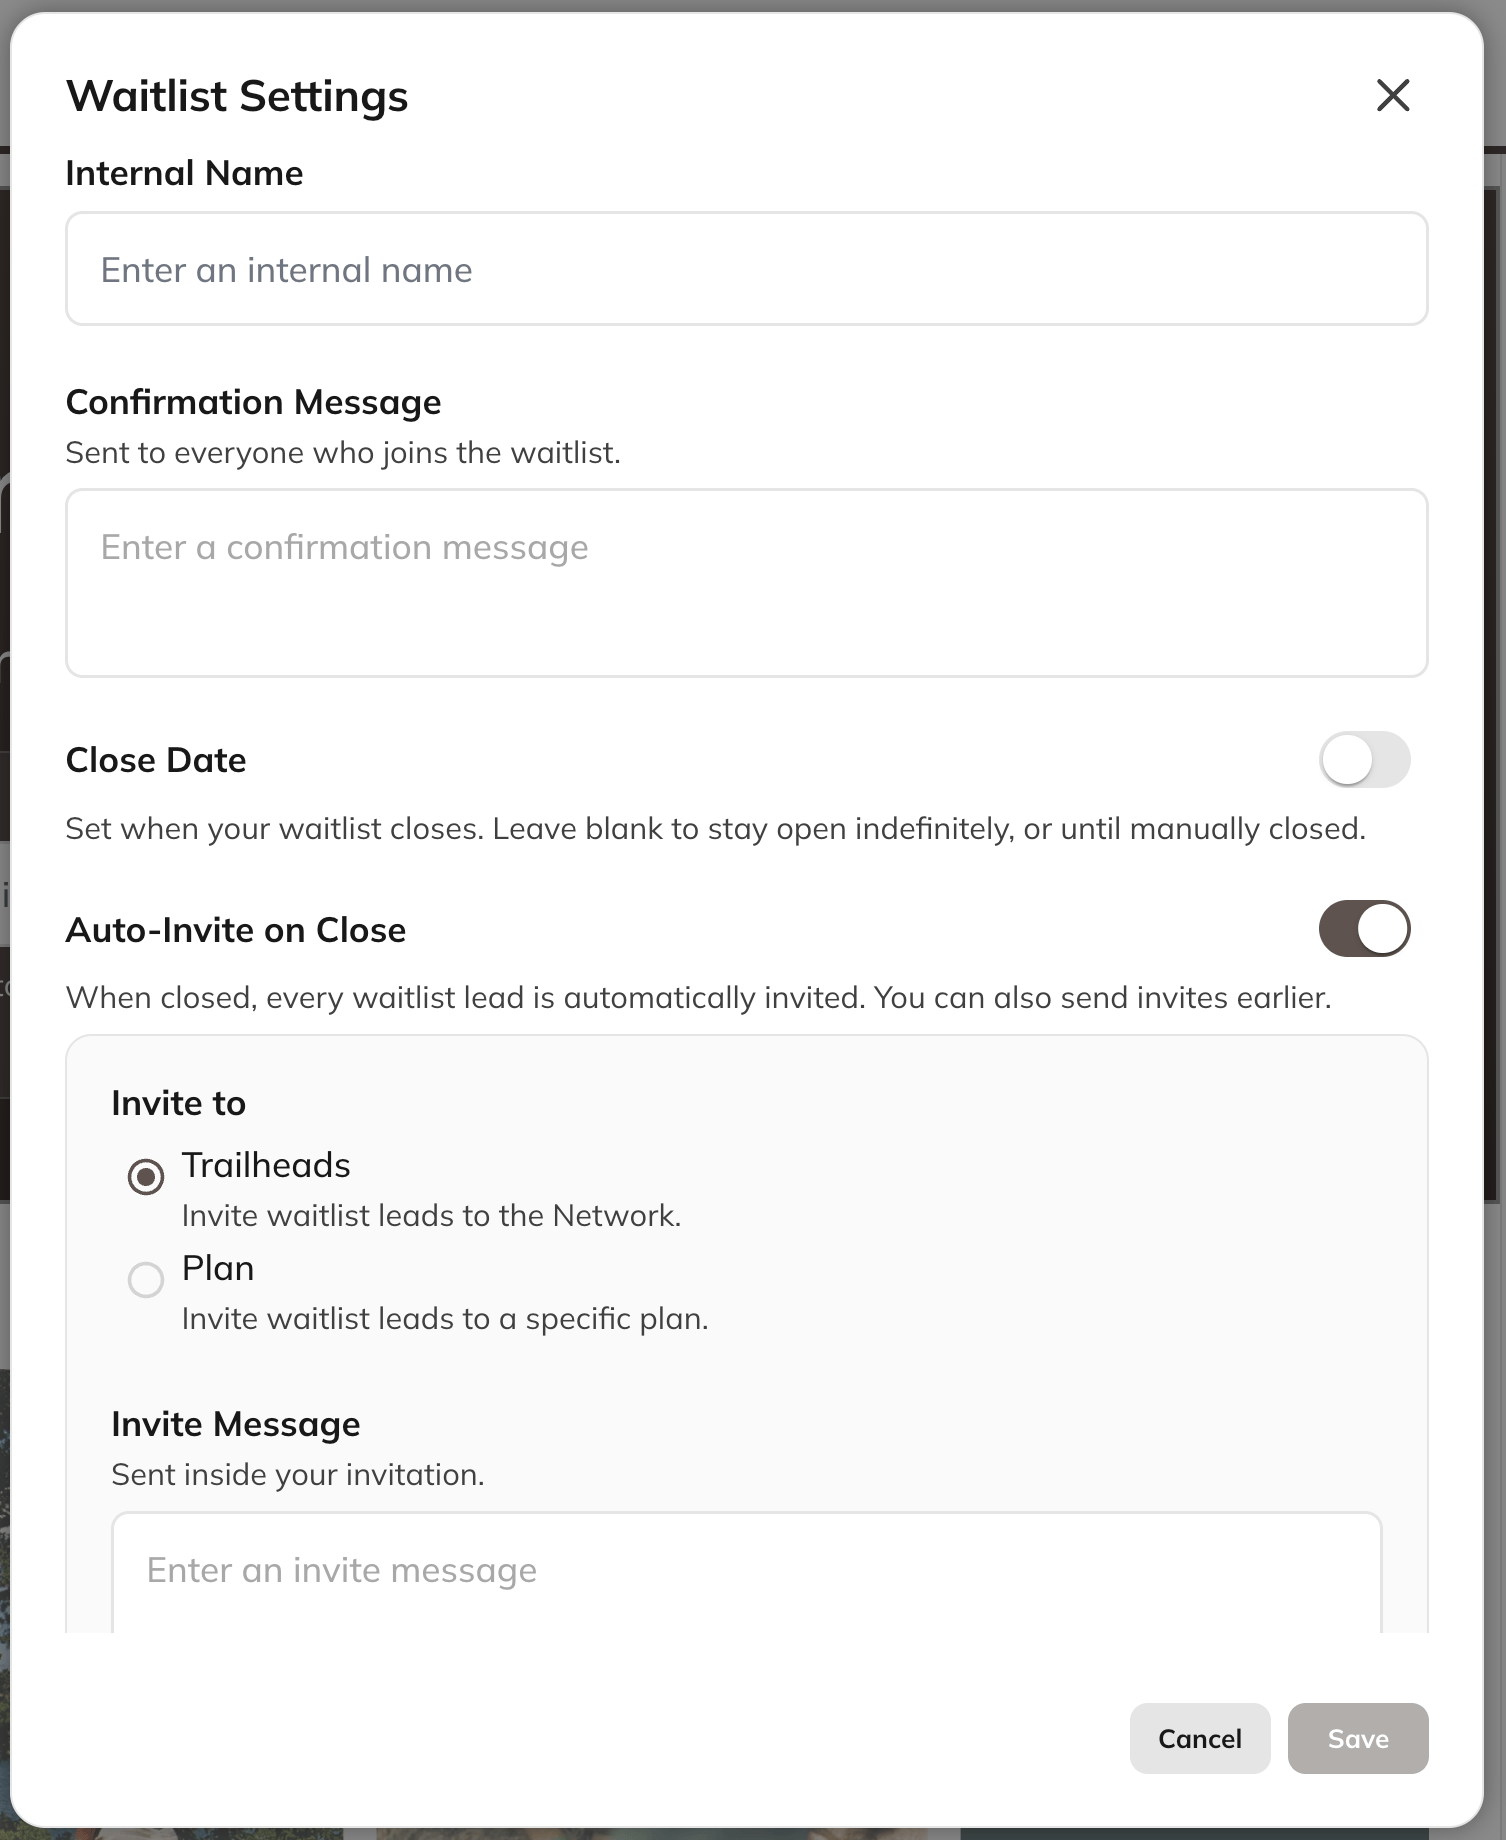 * **Internal Name** (for your reference)
* **Customize the confirmation message** -this is the message that people who join the waitlist will receive
* **Close Date and Time** (optional)
* If you would like to have a countdown timer, choose this option
* **Auto-Invite on Close** (optional)
* If you enable **Auto-Invite on Close**, choose whether people should be invited to:
* Your Mighty Network, or
* A specific Plan and[ where you would like them to land](https://docs.mightynetworks.com/for-hosts/payments-and-access/how-do-i-create-a-plan#plan-landing-page):
* Plan Landing Page
* Create Account Page
* Sign in Page
* Customize the invitation message that will be sent when the waitlist closes.
* Save your waitlist.
### **From the Waitlists Page**
1. Go to **Admin > Marketing > Waitlists**.
2. Select **Create Waitlist**.
* **Internal Name** (for your reference)
* **Customize the confirmation message** -this is the message that people who join the waitlist will receive
* **Close Date and Time** (optional)
* If you would like to have a countdown timer, choose this option
* **Auto-Invite on Close** (optional)
* If you enable **Auto-Invite on Close**, choose whether people should be invited to:
* Your Mighty Network, or
* A specific Plan and[ where you would like them to land](https://docs.mightynetworks.com/for-hosts/payments-and-access/how-do-i-create-a-plan#plan-landing-page):
* Plan Landing Page
* Create Account Page
* Sign in Page
* Customize the invitation message that will be sent when the waitlist closes.
* Save your waitlist.
### **From the Waitlists Page**
1. Go to **Admin > Marketing > Waitlists**.
2. Select **Create Waitlist**.
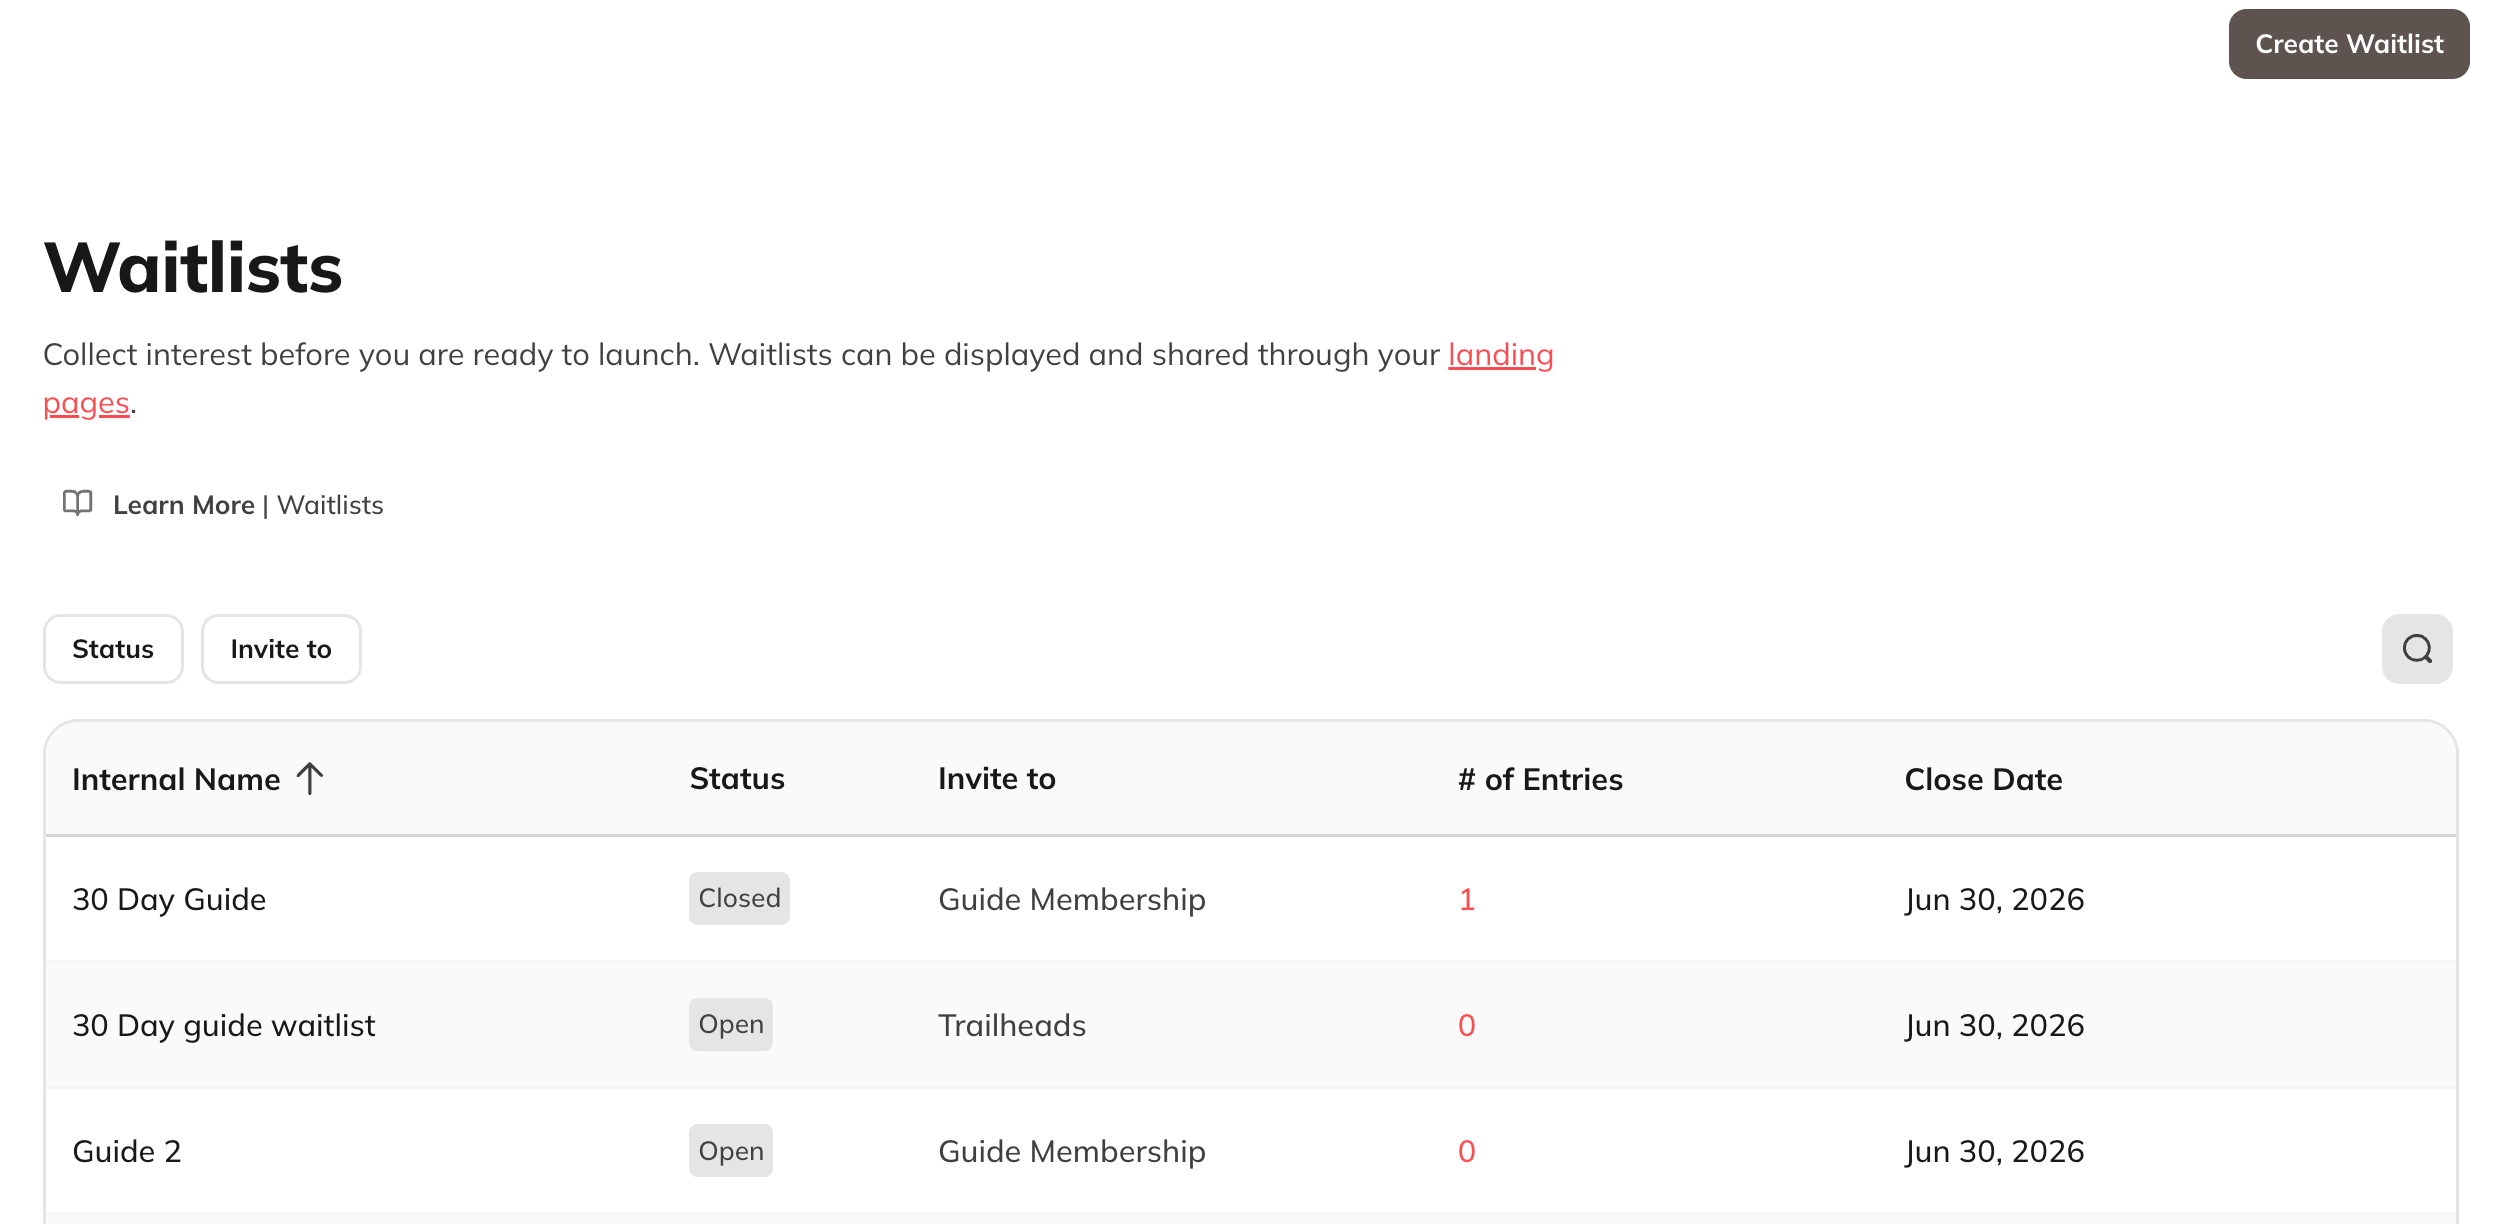 Then follow the same steps as above to setup the waitlist.
## **Customize Your Waitlist**
Once your waitlist has been created, you can customize how it appears on your Landing Page.
You can edit:
* Heading and description
* Call-to-action button text
* Background image
* Optional countdown timer
The colors that it shows are from your[ Network branding colors](https://docs.mightynetworks.com/for-hosts/setting-up-your-network/how-do-i-set-up-my-network-branding#colors).
When you're ready, **click Save.**
## **Waitlist Notifications**
### **Host notifications**
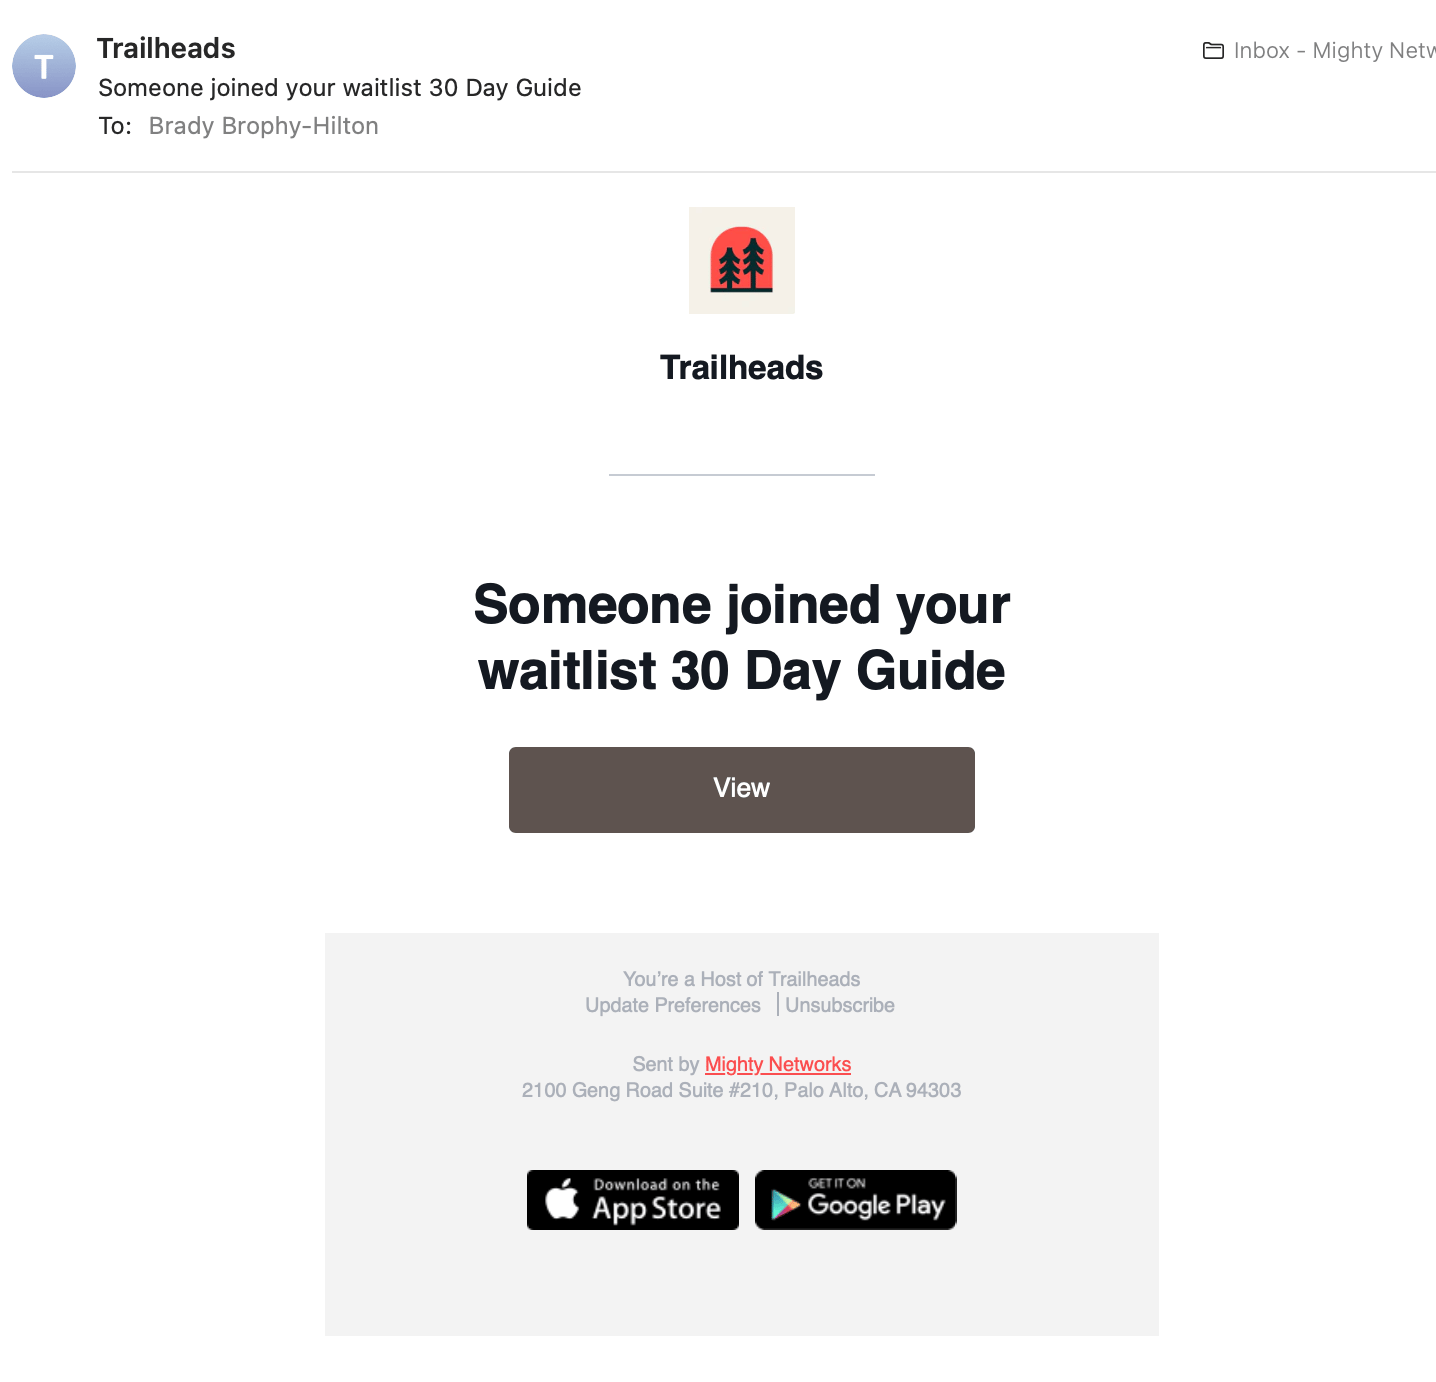
As a Host, you will receive a notification (email, in-app or push) whenever someone joins a waitlist.
This notification is turned on by default and you can manage it by going to **Personal Settings > Notifications**
Then follow the same steps as above to setup the waitlist.
## **Customize Your Waitlist**
Once your waitlist has been created, you can customize how it appears on your Landing Page.
You can edit:
* Heading and description
* Call-to-action button text
* Background image
* Optional countdown timer
The colors that it shows are from your[ Network branding colors](https://docs.mightynetworks.com/for-hosts/setting-up-your-network/how-do-i-set-up-my-network-branding#colors).
When you're ready, **click Save.**
## **Waitlist Notifications**
### **Host notifications**
As a Host, you will receive a notification (email, in-app or push) whenever someone joins a waitlist.
This notification is turned on by default and you can manage it by going to **Personal Settings > Notifications**
 ### **Waitlist confirmation emails**
When someone joins your waitlist, they'll automatically receive a confirmation email letting them know they've successfully signed up. The email also includes an unsubscribe link.
If they are a full member, they will also get an in-app or push notification.
### **Waitlist confirmation emails**
When someone joins your waitlist, they'll automatically receive a confirmation email letting them know they've successfully signed up. The email also includes an unsubscribe link.
If they are a full member, they will also get an in-app or push notification.
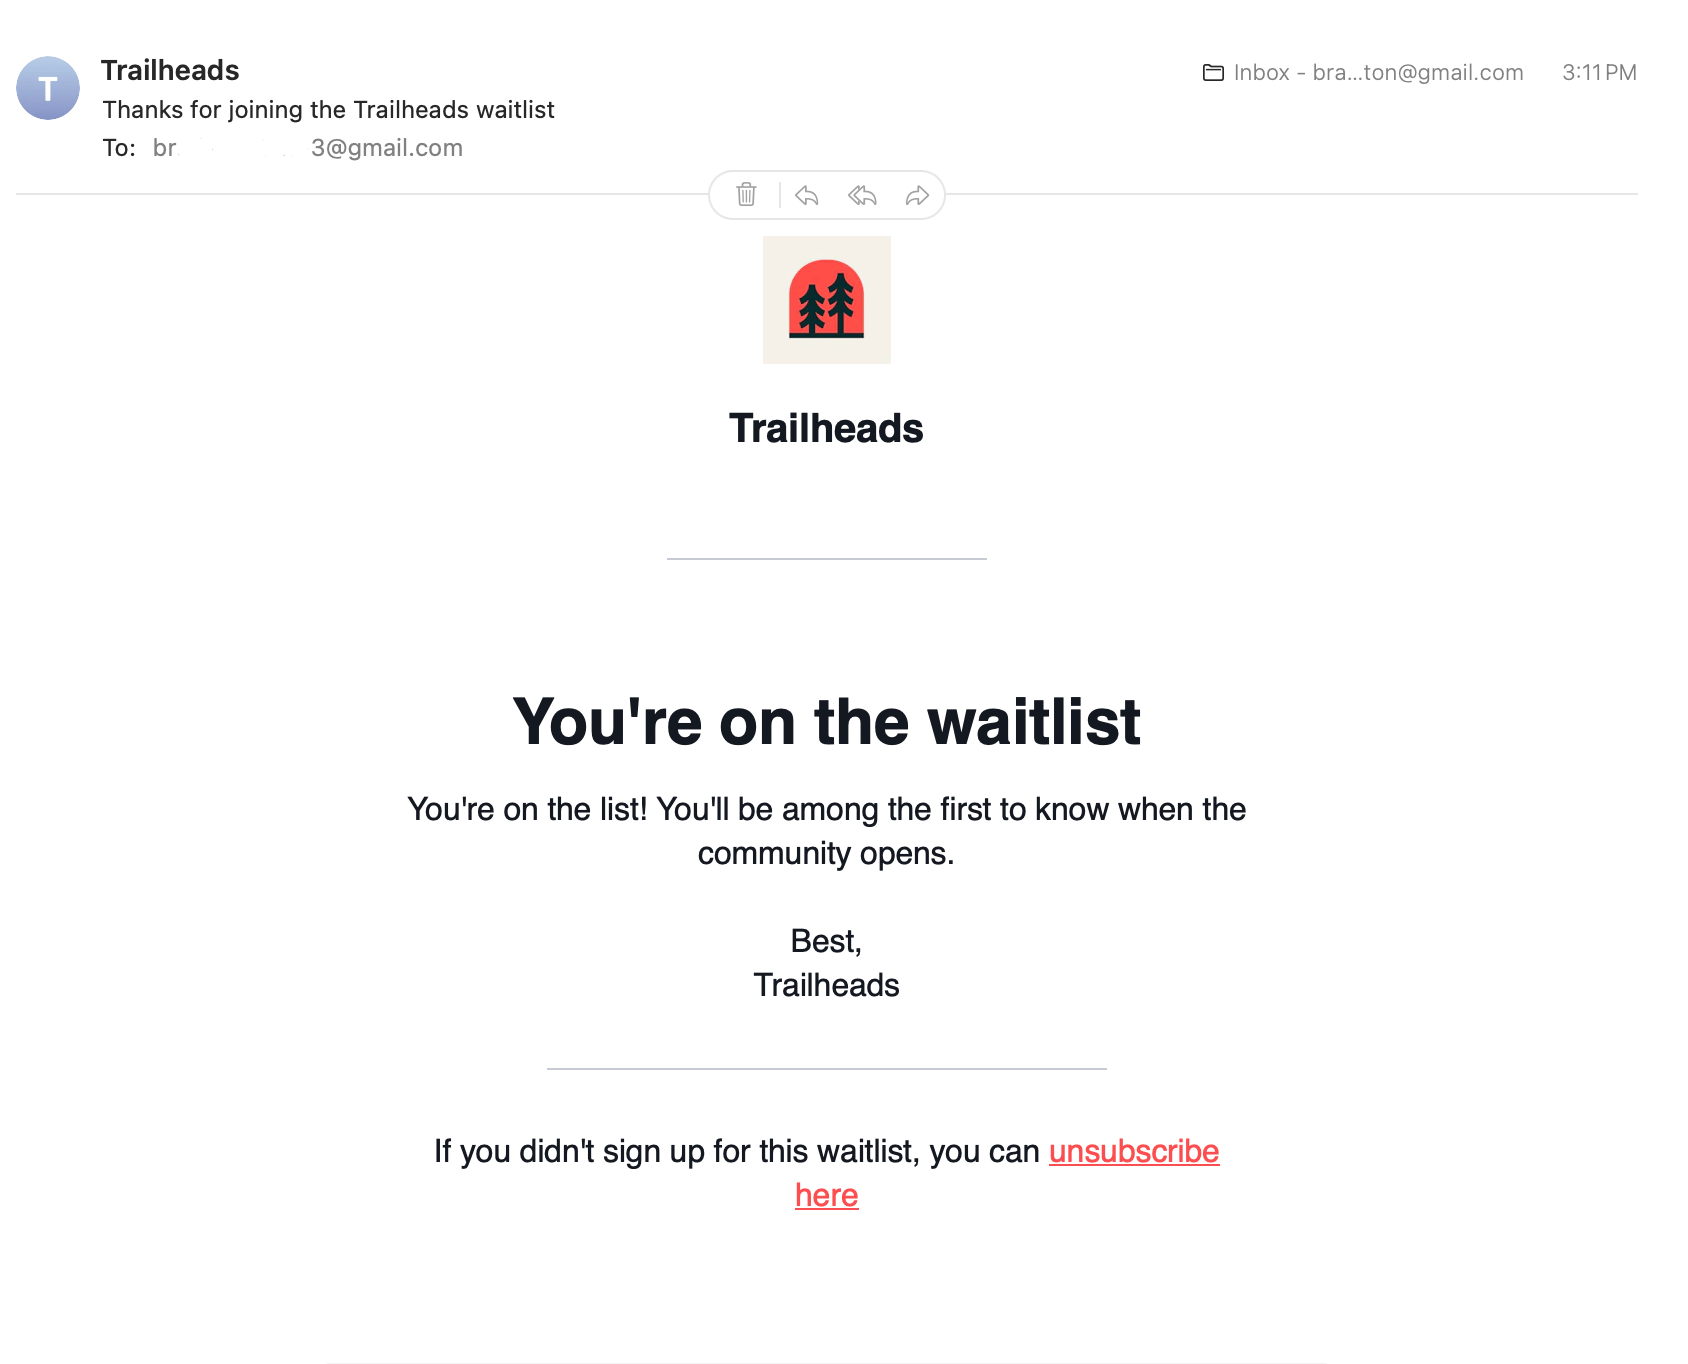 **Tip:** We recommend joining your own waitlist with a test email address to confirm both the signup confirmation and confirmation email look the way you expect.
## **Managing Waitlists**
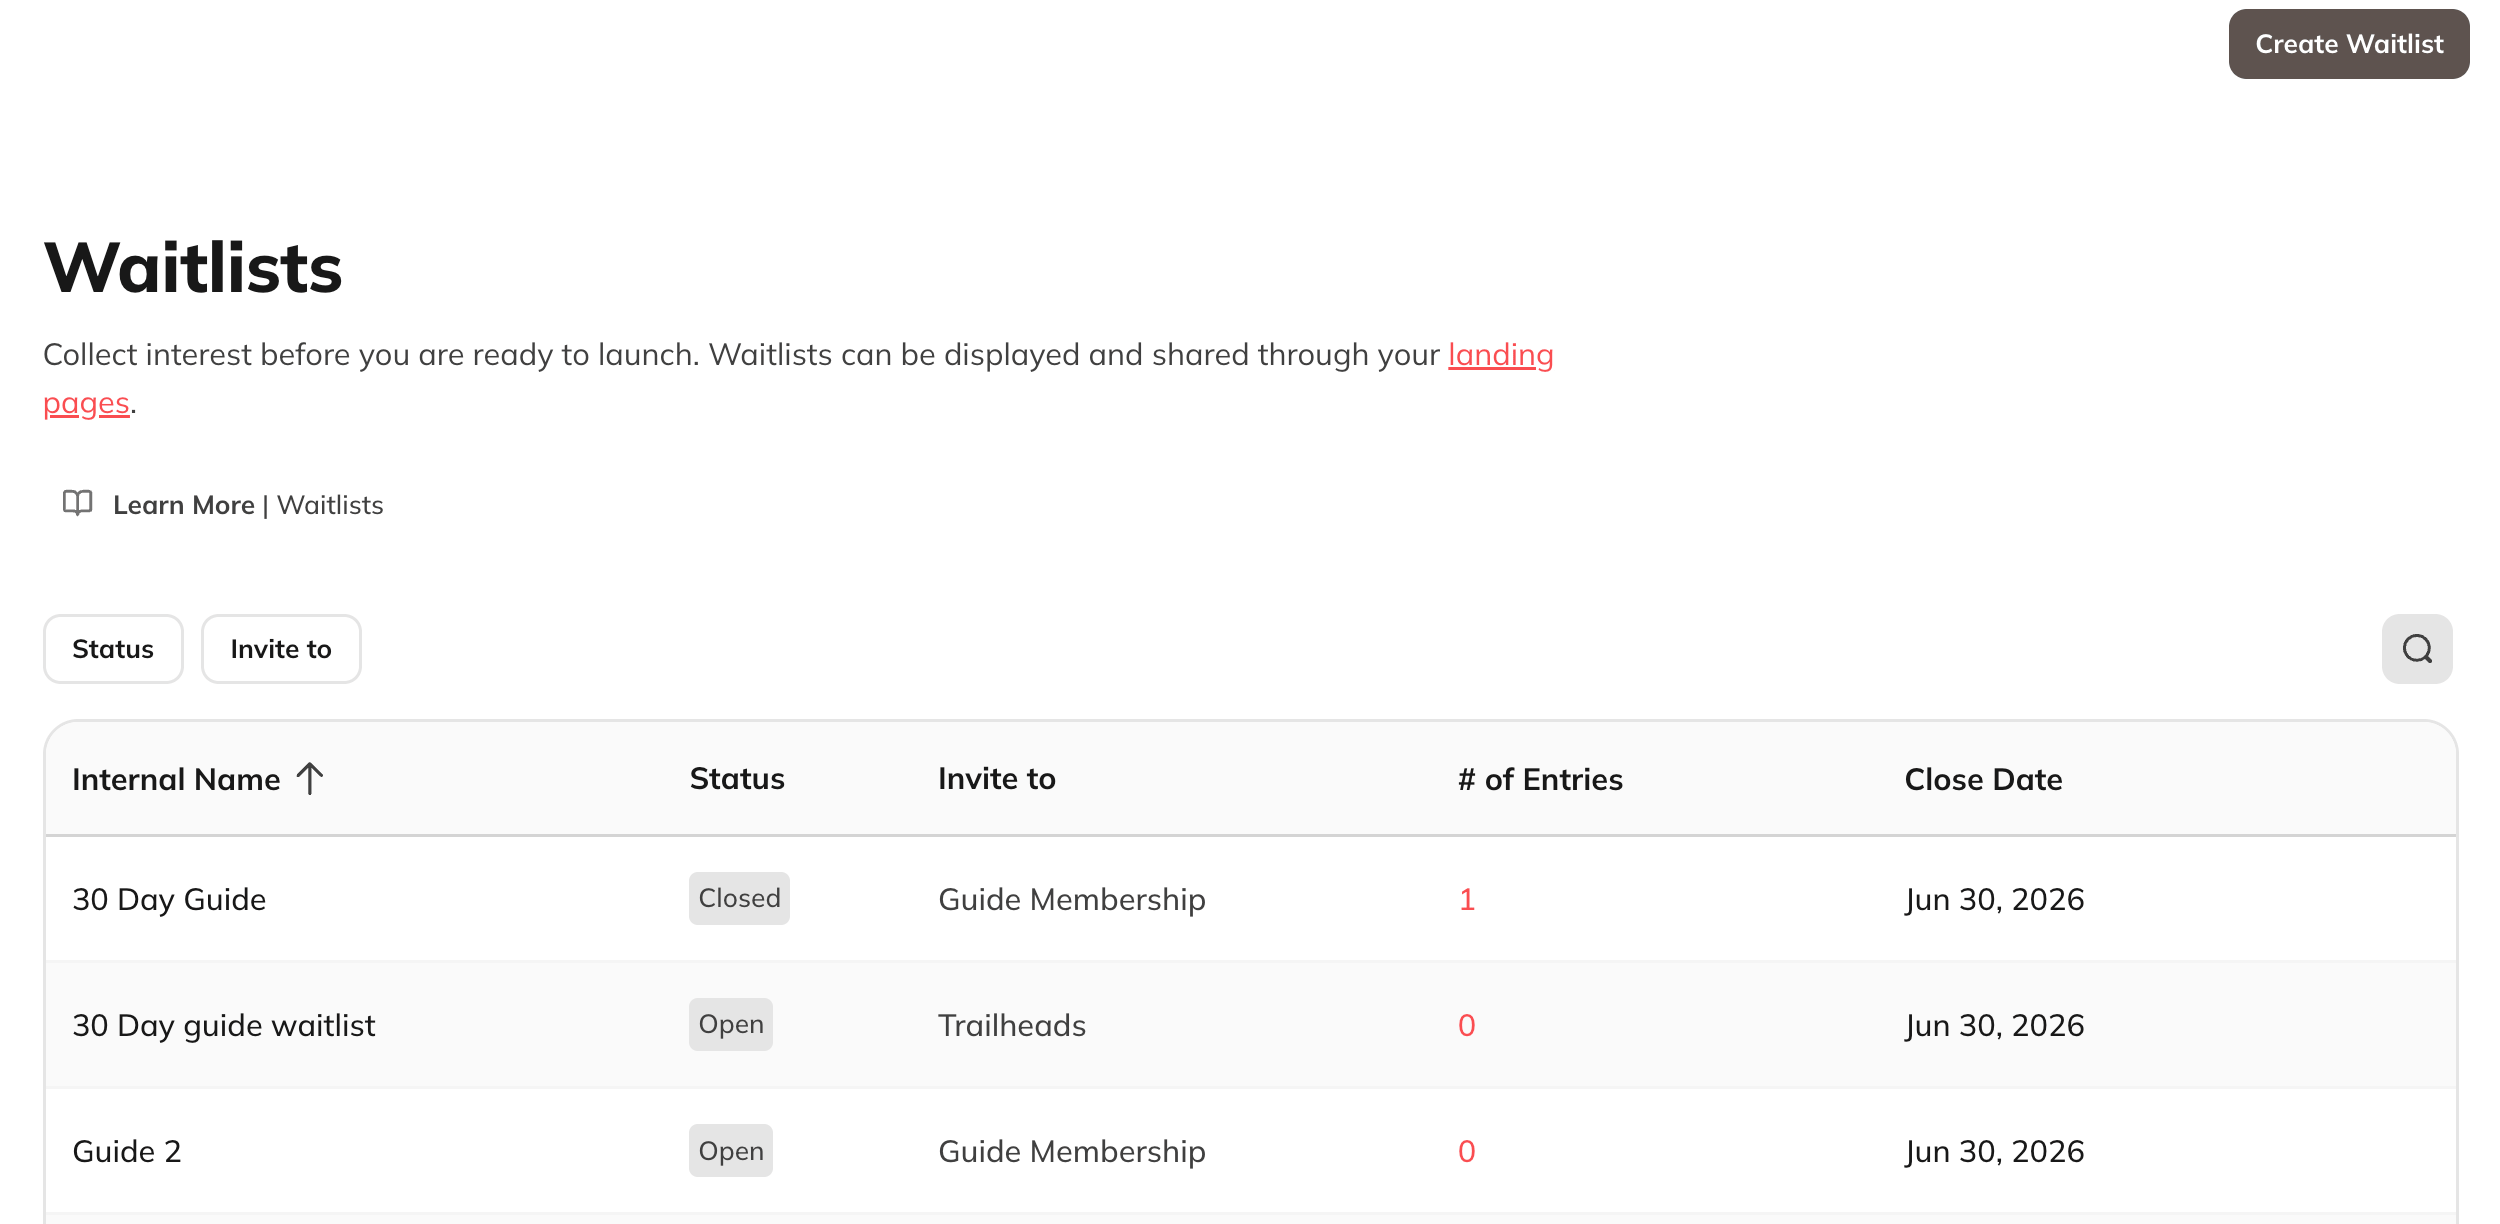
To manage your waitlists, go to:
**Admin** > **Marketing** > **Waitlists**
**Tip:** We recommend joining your own waitlist with a test email address to confirm both the signup confirmation and confirmation email look the way you expect.
## **Managing Waitlists**
To manage your waitlists, go to:
**Admin** > **Marketing** > **Waitlists**
 From here you can:
* View all waitlists
* Edit waitlists
* Sort waitlists
* View waitlist leads
* Manually close a waitlist
* Delete a waitlist
## **Manage Leads**
All waitlist signups are available in:
**Admin** > **Members** > **Leads**
From here you can:
* View all waitlists
* Edit waitlists
* Sort waitlists
* View waitlist leads
* Manually close a waitlist
* Delete a waitlist
## **Manage Leads**
All waitlist signups are available in:
**Admin** > **Members** > **Leads**
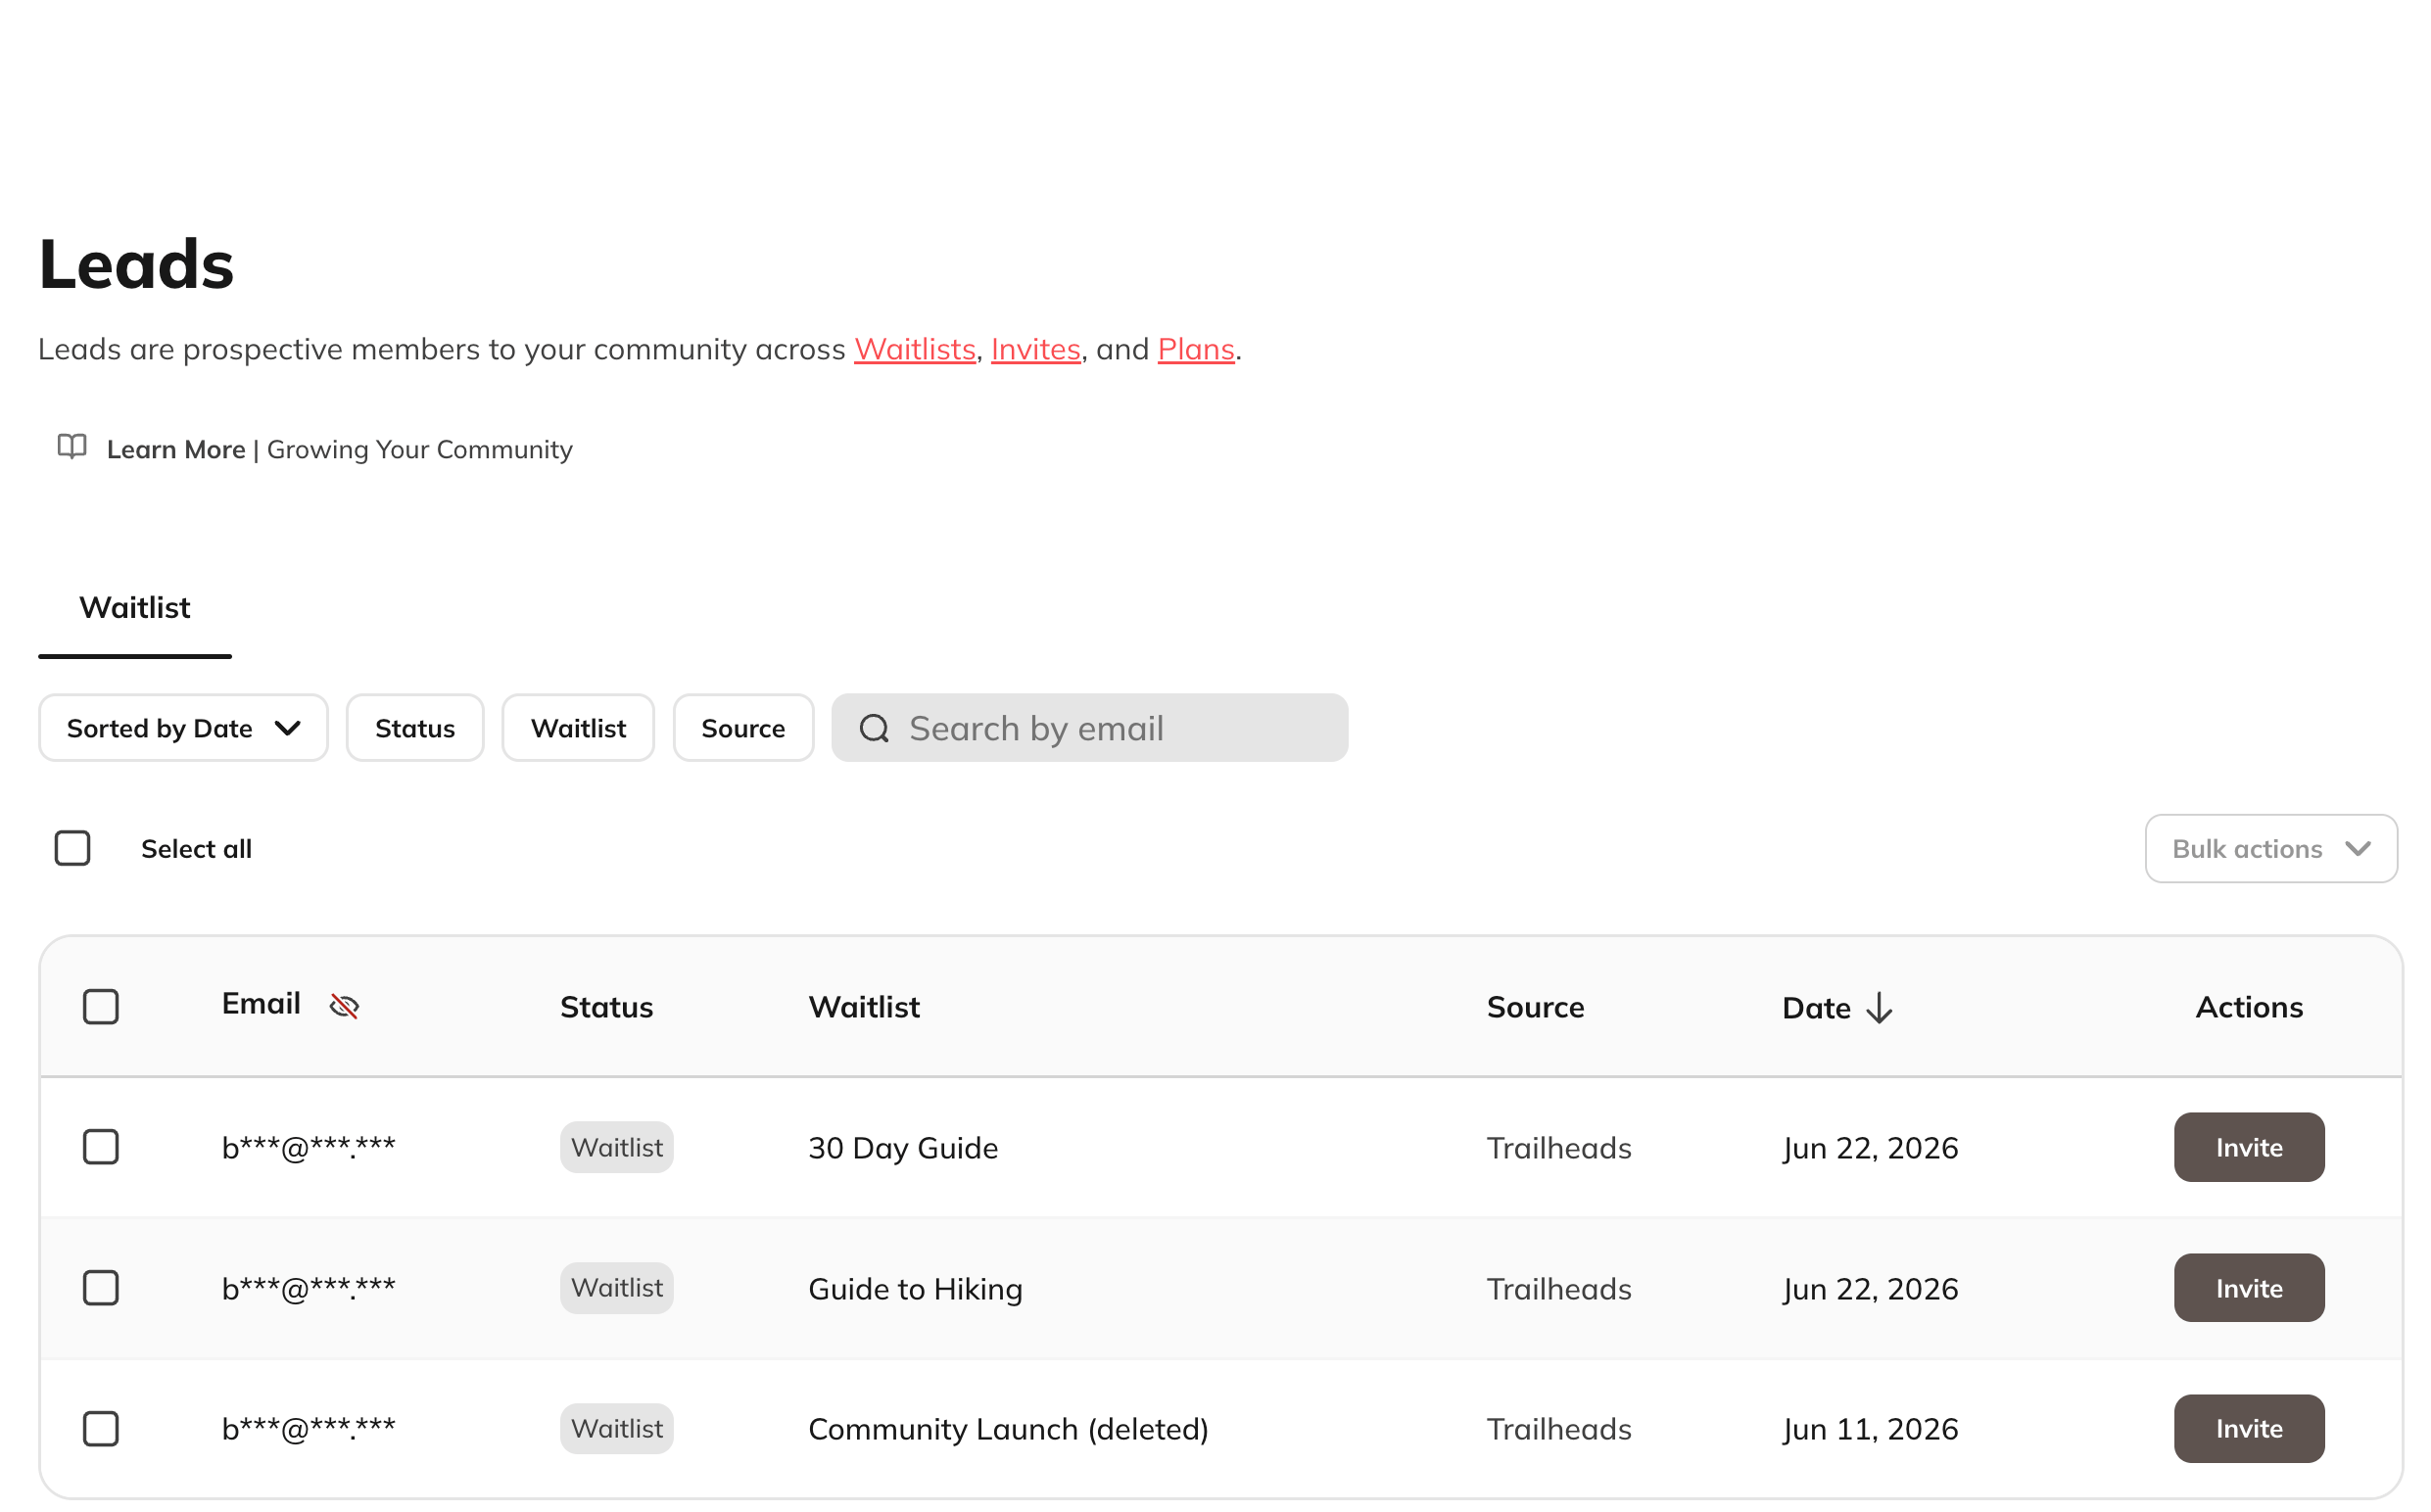 This page also includes [**Sent Invites** and **Requests to Join**](https://docs.mightynetworks.com/for-hosts/payments-and-access/how-do-i-manage-sent-invites-and-requests-to-join), making it the central place to manage prospective members.
From the Leads page you can:
* Search by email address
* Filter by:
* Date
* Status
* Waitlist
* Source landing page
On the[ Explore plan and above](https://docs.mightynetworks.com/for-hosts/meet-mighty/exploreplan#what%E2%80%99s-included-in-the-mighty-networks-explore-plan) you will be able to
* See lead emails
* Invite individual leads
* Send bulk invitations
* Download leads as a CSV
## **Sync Waitlists with Kit**
If you use the[ Kit integration](https://docs.mightynetworks.com/for-hosts/marketing-features/how-do-i-create-an-email-newsletter#how-do-i-create-an-email-newsletter), you can automatically sync waitlist signups.
To enable syncing:
1. Go to **Admin** > **Integrations** > **Kit**.
2. Turn on **Sync Waitlist Emails**.
This page also includes [**Sent Invites** and **Requests to Join**](https://docs.mightynetworks.com/for-hosts/payments-and-access/how-do-i-manage-sent-invites-and-requests-to-join), making it the central place to manage prospective members.
From the Leads page you can:
* Search by email address
* Filter by:
* Date
* Status
* Waitlist
* Source landing page
On the[ Explore plan and above](https://docs.mightynetworks.com/for-hosts/meet-mighty/exploreplan#what%E2%80%99s-included-in-the-mighty-networks-explore-plan) you will be able to
* See lead emails
* Invite individual leads
* Send bulk invitations
* Download leads as a CSV
## **Sync Waitlists with Kit**
If you use the[ Kit integration](https://docs.mightynetworks.com/for-hosts/marketing-features/how-do-i-create-an-email-newsletter#how-do-i-create-an-email-newsletter), you can automatically sync waitlist signups.
To enable syncing:
1. Go to **Admin** > **Integrations** > **Kit**.
2. Turn on **Sync Waitlist Emails**.
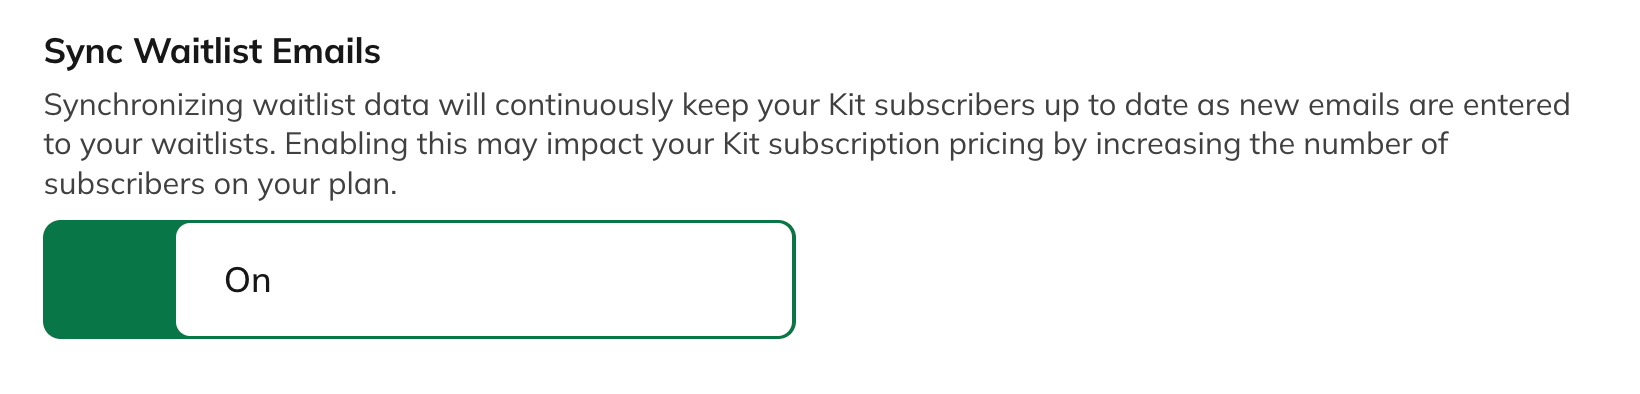 Note: syncing will not be on automatically and emails will not sync retroactively
Waitlist signups are sent to Kit with the following tags:
* **Waitlist Name**
* **Mighty Networks Integration**
Once someone creates an account, their Network tag will also be added.
After enabling the integration, create a test signup to verify that new waitlist leads are syncing correctly.
## **Close a Waitlist**
You can manually close a waitlist at any time.
1. Go to **Admin** > **Marketing** > **Waitlists**.
2. Select your waitlist.
3. Click **Close Waitlist**.
If **Auto-Invite on Close** is enabled, everyone on the waitlist will automatically receive your invitation email.
## **Frequently Asked Questions**
### **Do people need a Mighty Networks account to join a waitlist?**
No. Anyone can join a waitlist by submitting their email address on your landing page.
### **Can I invite people later?**
Yes. You can invite individual leads or send invitations in bulk from **Admin** > **Members** > **Leads**.
### **Can I automatically invite everyone when my waitlist closes?**
Yes. Enable **Auto-Invite on Close** when creating your waitlist.
### **Can I add Leads to a Space, plan etc?**
At this time, Leads haven't created a full account yet, so they can't be managed as full or limited members.
### **Can people see where they are in line?**
No. Waitlists do not display a person's position.
### **Can I limit the number of people on a waitlist?**
Waitlists do not currently support capacity limits.
### **Can I create a waitlist for an individual Space?**
Waitlists are added to landing pages and can invite people to your Network or a specific Plan. They are not available for individual Spaces.
Note: syncing will not be on automatically and emails will not sync retroactively
Waitlist signups are sent to Kit with the following tags:
* **Waitlist Name**
* **Mighty Networks Integration**
Once someone creates an account, their Network tag will also be added.
After enabling the integration, create a test signup to verify that new waitlist leads are syncing correctly.
## **Close a Waitlist**
You can manually close a waitlist at any time.
1. Go to **Admin** > **Marketing** > **Waitlists**.
2. Select your waitlist.
3. Click **Close Waitlist**.
If **Auto-Invite on Close** is enabled, everyone on the waitlist will automatically receive your invitation email.
## **Frequently Asked Questions**
### **Do people need a Mighty Networks account to join a waitlist?**
No. Anyone can join a waitlist by submitting their email address on your landing page.
### **Can I invite people later?**
Yes. You can invite individual leads or send invitations in bulk from **Admin** > **Members** > **Leads**.
### **Can I automatically invite everyone when my waitlist closes?**
Yes. Enable **Auto-Invite on Close** when creating your waitlist.
### **Can I add Leads to a Space, plan etc?**
At this time, Leads haven't created a full account yet, so they can't be managed as full or limited members.
### **Can people see where they are in line?**
No. Waitlists do not display a person's position.
### **Can I limit the number of people on a waitlist?**
Waitlists do not currently support capacity limits.
### **Can I create a waitlist for an individual Space?**
Waitlists are added to landing pages and can invite people to your Network or a specific Plan. They are not available for individual Spaces.