> ## Documentation Index
> Fetch the complete documentation index at: https://docs.mightynetworks.com/llms.txt
> Use this file to discover all available pages before exploring further.
# How Do I Set Up Promotional Banners in My Network?
> Learn how to target audiences with promotional banners
**Promotional Banners** let you display custom messages to specific member audiences for a set period of time. Use them to highlight a new offer, share a discount, or drive action—right where your members already are.
You can target banners to different member segments using attributes like [plan](https://docs.mightynetworks.com/for-hosts/payments-and-access/how-do-i-create-a-plan) membership, [tags](https://docs.mightynetworks.com/for-hosts/gamification/how-do-i-add-custom-badges-and-tags-for-my-members), or [badges](https://docs.mightynetworks.com/for-members/engage-and-interact/what-are-streaks-and-recognitions).
## Step 1: Create an Audience
Before creating a banner, define the audience you want to target.
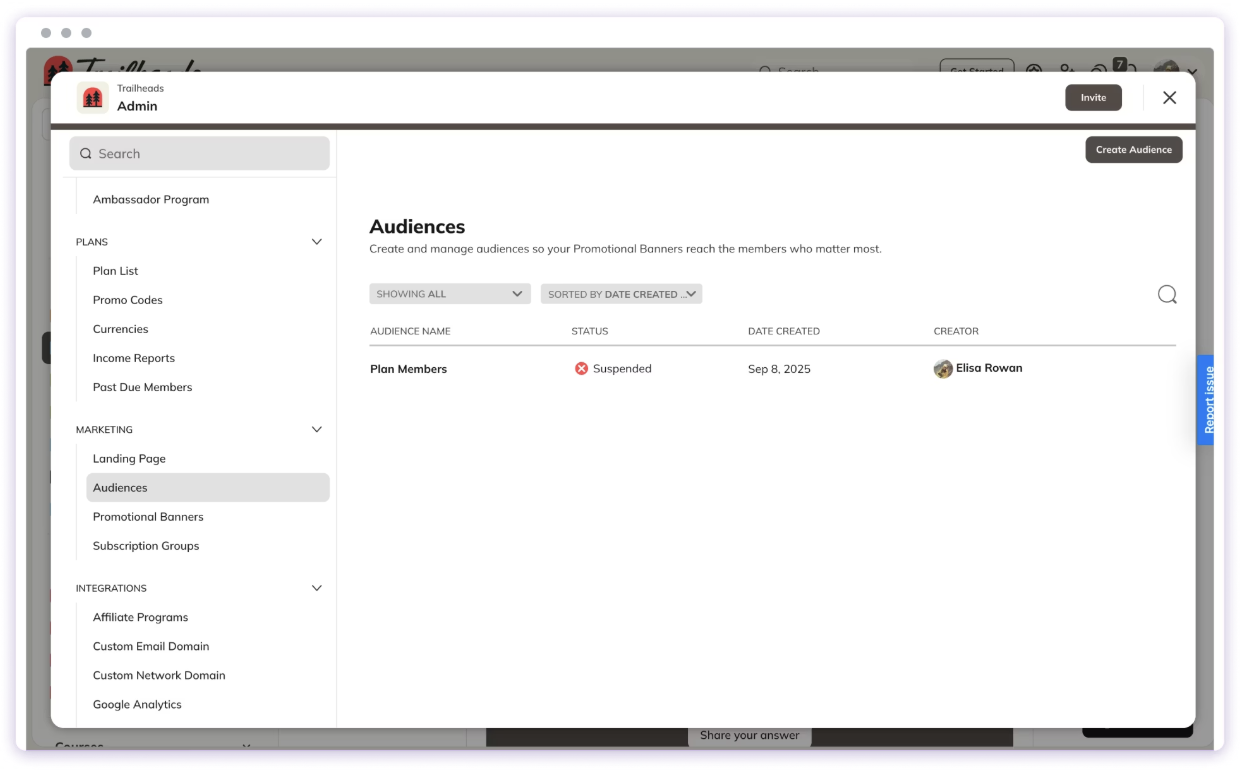 1. Go to **Admin > Marketing > Audiences.**
2. Click **Create Audience.**
3. Give your audience a name (for example, “Plan Members”).
4. Choose one or more **Attributes**, such as:
* Network
* [Plan membership](https://docs.mightynetworks.com/for-hosts/payments-and-access/how-do-i-create-a-plan)
* Space access
* [Tags](https://docs.mightynetworks.com/for-hosts/gamification/how-do-i-add-custom-badges-and-tags-for-my-members)
* [Custom fields](https://docs.mightynetworks.com/for-hosts/gamification/how-do-i-add-custom-fields)
* [Badges](https://docs.mightynetworks.com/for-hosts/gamification/how-do-i-add-custom-badges-and-tags-for-my-members)
5. (Optional) Exclude members based on specific criteria.
This lets you narrow down exactly who sees your message.For example, target “Members on a paid plan excluding those tagged ‘Founding Member.’”
For more information on Audiences, [**check out this article**](https://docs.mightynetworks.com/for-hosts/marketing-features/how-do-i-segment-my-members-with-audiences).
## Step 2: Create the Banner
Once your audience is ready:
1. Go to **Admin > Marketing > Promotional Banners.**
2. Click **Create New Banner.**
Then fill out the banner details:
* **Internal Title:** For your reference.
* **Headline:** The main message (for example, “Enjoy 50% Off Our New Offering”).
* **Description:** (Optional) Supporting text (for example, “Half off for a limited time”).
### Add a Button (Optional)
You can include a call-to-action button:
* **Label:** Choose the text (for example, “Redeem”).
* **Link:** Direct it to a Plan, an internal URL, or any external link.
## Step 3: Choose the Audience
Select the audience you created in Step 1. Only members who meet that audience’s criteria will see the banner—and only in areas of the Network they have access to.
## Step 4: Set a Schedule
You can control when your banner appears and disappears.
* **Start Date & Time:** Leave blank to publish immediately.
* **End Date & Time:** Leave blank to keep the banner running until manually turned off.
For example, schedule a banner from **Sept 8 at 12 PM** to **Sept 15 at 5 PM.**
## Step 5: Allow or Prevent Dismissal
You can let members permanently dismiss the banner. If you leave this unchecked, the banner remains visible until it expires or you manually deactivate it.
## Step 6: Review and Create
Once everything looks good, click **Create.**
If your start time is in the future, the banner will appear as \*\*Scheduled.\*\* You can **view, edit, duplicate, or deactivate** banners anytime from **Admin > Marketing > Promotional Banners.**
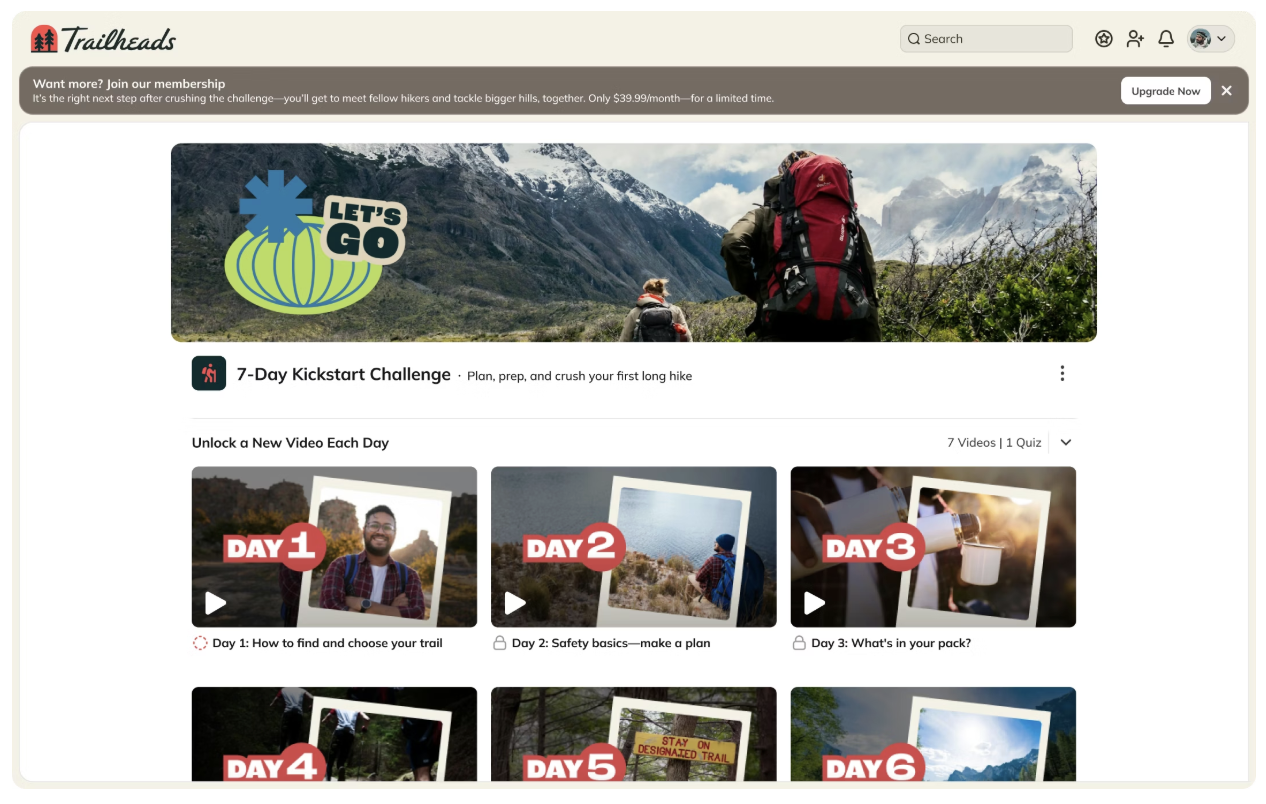
Here's what a banner looks like on web:
1. Go to **Admin > Marketing > Audiences.**
2. Click **Create Audience.**
3. Give your audience a name (for example, “Plan Members”).
4. Choose one or more **Attributes**, such as:
* Network
* [Plan membership](https://docs.mightynetworks.com/for-hosts/payments-and-access/how-do-i-create-a-plan)
* Space access
* [Tags](https://docs.mightynetworks.com/for-hosts/gamification/how-do-i-add-custom-badges-and-tags-for-my-members)
* [Custom fields](https://docs.mightynetworks.com/for-hosts/gamification/how-do-i-add-custom-fields)
* [Badges](https://docs.mightynetworks.com/for-hosts/gamification/how-do-i-add-custom-badges-and-tags-for-my-members)
5. (Optional) Exclude members based on specific criteria.
This lets you narrow down exactly who sees your message.For example, target “Members on a paid plan excluding those tagged ‘Founding Member.’”
For more information on Audiences, [**check out this article**](https://docs.mightynetworks.com/for-hosts/marketing-features/how-do-i-segment-my-members-with-audiences).
## Step 2: Create the Banner
Once your audience is ready:
1. Go to **Admin > Marketing > Promotional Banners.**
2. Click **Create New Banner.**
Then fill out the banner details:
* **Internal Title:** For your reference.
* **Headline:** The main message (for example, “Enjoy 50% Off Our New Offering”).
* **Description:** (Optional) Supporting text (for example, “Half off for a limited time”).
### Add a Button (Optional)
You can include a call-to-action button:
* **Label:** Choose the text (for example, “Redeem”).
* **Link:** Direct it to a Plan, an internal URL, or any external link.
## Step 3: Choose the Audience
Select the audience you created in Step 1. Only members who meet that audience’s criteria will see the banner—and only in areas of the Network they have access to.
## Step 4: Set a Schedule
You can control when your banner appears and disappears.
* **Start Date & Time:** Leave blank to publish immediately.
* **End Date & Time:** Leave blank to keep the banner running until manually turned off.
For example, schedule a banner from **Sept 8 at 12 PM** to **Sept 15 at 5 PM.**
## Step 5: Allow or Prevent Dismissal
You can let members permanently dismiss the banner. If you leave this unchecked, the banner remains visible until it expires or you manually deactivate it.
## Step 6: Review and Create
Once everything looks good, click **Create.**
If your start time is in the future, the banner will appear as \*\*Scheduled.\*\* You can **view, edit, duplicate, or deactivate** banners anytime from **Admin > Marketing > Promotional Banners.**
Here's what a banner looks like on web:
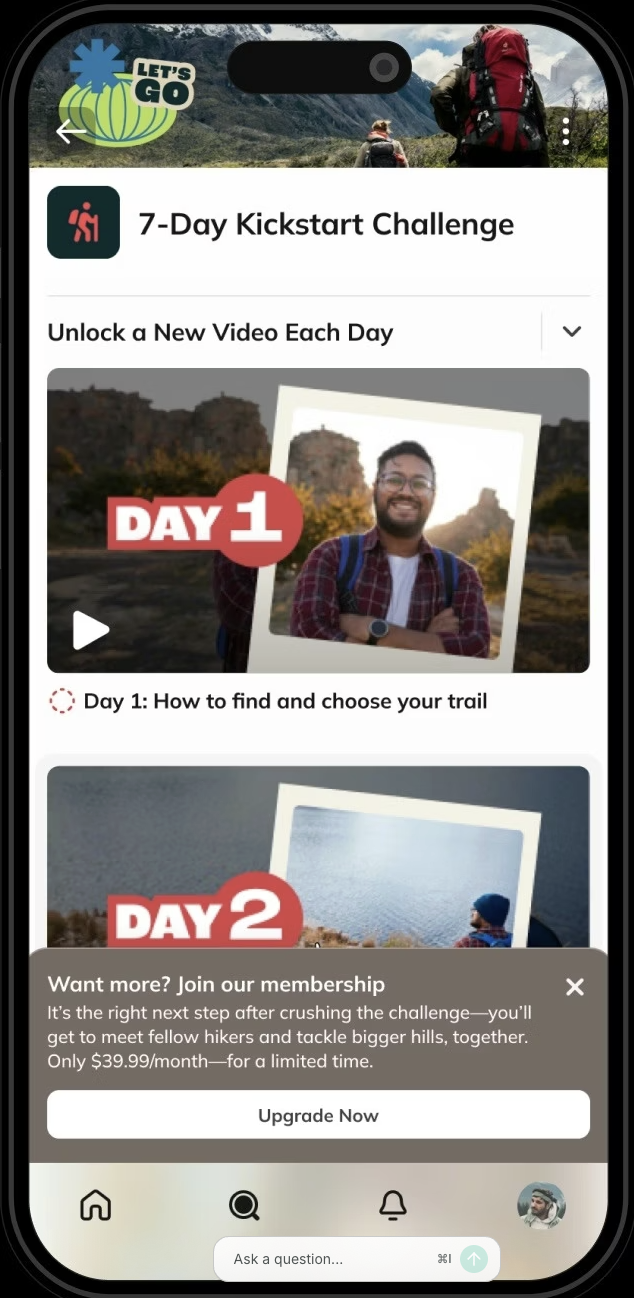
 And on mobile:
 ## Frequently Asked Questions
### Who can use Promotional Banners?
Promotional Banners are available on the **Launch Plan and up.**
* **Launch Plan:** Up to 2 total (live or scheduled)
* **Scale Plan:** Up to 5
* **Growth Plan:** Up to 10
* **Mighty Pro:** Up to 15
If you’ve reached your limit, you can still create new banners, but they’ll remain inactive until you deactivate an existing one.
### How does scheduling work?
* If the **Start Time** is blank, the banner goes live immediately (as long as you’re under your banner limit).
* If the **Start Time** is set, it activates automatically at that time.
* If the **End Time** is set, it deactivates automatically when that time is reached.
* If the **End Time** is blank, it stays live until manually turned off.
Once scheduled, a banner counts toward your total limit (for example, 1 live + 1 scheduled = 2 total on the Launch Plan).
### What if a member qualifies for more than one banner?
If a member qualifies for multiple active banners, they’ll see the **most recently created** live one.
### Can I Customize Banners?
Yes. You can customize:
* The headline
* The description
* The CTA button label and link (Plan or URL)
At this time, banners don’t support images. They’re designed to display consistently across all devices.
The color of your banner matches your Network’s **theme color**:
* If you’re using **basic colors**, it uses your theme color.
* If you’re using **advanced colors**, it matches your advanced button color.
You can adjust colors under **Admin > Branding > Colors.**
### Where can I link the CTA button?
You can link the button to:
* A **Plan** (ideal for promotions)
* An **internal URL** (like an event or Space)
* An **external link** (like a sponsor site or form)
### Does the Audience Builder work outside of banners?
Yes! You can use Audiences inside of Automations.
[Check out this article to learn more](https://docs.mightynetworks.com/for-hosts/automations/how-can-i-set-up-automations-in-my-mighty-network).
## Frequently Asked Questions
### Who can use Promotional Banners?
Promotional Banners are available on the **Launch Plan and up.**
* **Launch Plan:** Up to 2 total (live or scheduled)
* **Scale Plan:** Up to 5
* **Growth Plan:** Up to 10
* **Mighty Pro:** Up to 15
If you’ve reached your limit, you can still create new banners, but they’ll remain inactive until you deactivate an existing one.
### How does scheduling work?
* If the **Start Time** is blank, the banner goes live immediately (as long as you’re under your banner limit).
* If the **Start Time** is set, it activates automatically at that time.
* If the **End Time** is set, it deactivates automatically when that time is reached.
* If the **End Time** is blank, it stays live until manually turned off.
Once scheduled, a banner counts toward your total limit (for example, 1 live + 1 scheduled = 2 total on the Launch Plan).
### What if a member qualifies for more than one banner?
If a member qualifies for multiple active banners, they’ll see the **most recently created** live one.
### Can I Customize Banners?
Yes. You can customize:
* The headline
* The description
* The CTA button label and link (Plan or URL)
At this time, banners don’t support images. They’re designed to display consistently across all devices.
The color of your banner matches your Network’s **theme color**:
* If you’re using **basic colors**, it uses your theme color.
* If you’re using **advanced colors**, it matches your advanced button color.
You can adjust colors under **Admin > Branding > Colors.**
### Where can I link the CTA button?
You can link the button to:
* A **Plan** (ideal for promotions)
* An **internal URL** (like an event or Space)
* An **external link** (like a sponsor site or form)
### Does the Audience Builder work outside of banners?
Yes! You can use Audiences inside of Automations.
[Check out this article to learn more](https://docs.mightynetworks.com/for-hosts/automations/how-can-i-set-up-automations-in-my-mighty-network).